Christmas presents for men

Choosing Christmas presents for men is something I always struggle with.  Finding presents that are useful, that they might actually like AND that are light and easy to post to Australia makes it even more difficult.  Socks might fit the brief however there are only so many pairs of socks any man would want.

Having decided to make as many presents as I could this year, the hot water bottle cover designed by Emma of Simple Pleasures Sewing was a perfect choice for my hard-to-buy-for male relatives.  Hottie covers are light, unbreakable, soft, practical (well, perhaps not in summer but come winter time and it will be their best friend) and, most importantly, easy to personalise.

The mechanic in the family is getting this great vintage car blueprints hottie cover (It’s ok.  He never reads my blog so it is safe to show it here).  The cover is lined in the teal Flurry spot that you can see behind the hottie cover.  As well as this indigo colour way, the outer fabric comes in other great manly colours of charcoal and black and also a fabulous vintage planes design.

Vintage cars hottie cover

Vintage cars hot water bottle cover


Whilst the teenage boys will be finding hottie covers made in this gorgeous London maps fabric under the tree.

London map hottie covers

London map hot water bottle covers


I love this map fabric (Passport by 3 Sisters for Moda).  It is like a giant i-spy game and comes in coloured versions too.  Being teenagers however I thought the masculine grey tones looked more grown up and would suit them better.

Their hottie covers are lined in a co-ordinating grey spotted Flurry fabric, making the inside just as fabulous, and all hottie covers are machine quilted to make them extra cosy.

I’ve loved making these hot water bottle covers and know that the men who receive them will also love them.  A win-win situation all round.

How to make a tiara cupcake topper

For a recent cake order, I was asked to include a tiara as one of the cupcake toppers. I did not have a specific mould or cutter for a tiara and no time to order one. What to do? Thankfully necessity is the mother of invention so time to get a bit creative with my existing cutters.


Here is my tiara topper, complete with a sparkly ruby heart jewel.


Tiara cupcake topper, tiara cupcake decoration

Tiara cupcake topper

And this is how I made it for anyone else who might like to make one too.


What you’ll need:


Tiara cupcake decoration materials

Tiara cupcake topper materials

I used florist paste to make my tiara however fondant mixed with a bit of tylose or gum trag would also work. Roll the paste until it is 2-3 mm thick. Don’t roll it too thin or the tiara won’t stand up.


Tiara cupcake decoration method

Tiara cupcake topper method

Use a frangipani cutter to cut out the main tiara shape (I love it when cutters are multi functional). Then use a small heart cutter to cut a heart shape on each side of the tiara. Use a small oval cutter to cut an oval in the centre.  The heart cutter I used was 1.5 cm at its widest point and the oval cutter was 1.3cm long.


Now it looks like a tiara. Stand it up, curve it into shape and leave to dry.  When it is dry, paint it with edible metallic paint or dust with metallic lustre dust.


To make the jewel, colour a small piece of paste dark red. Roll it out about 1mm thick and cut out a heart using a tiny heart cutter. Paint with edible glue and shake over edible glitter. Glue it onto your tiara. Ta-dah! You now have a headdress fit for any princess.

Cosy cat hot water bottle cover

What do you do when it is cold and grey outside?  For me, I like to sew, particularly if I am making something that will be cosy and warm.  
 
Cosy cat hot water bottle cover

Cat and mouse fabric

I had picked out these fabrics some time ago thinking that they would be perfect to make into a hot water bottle cover.  The gorgeous green is one from the Miss Kate collection by Bonnie and Camille (Moda) whilst the statement Cat and Mouse fabric is from Timeless Treasures.  


And here is the finished item, whipped up on the weekend.  A lovely hottie cover perfect for a friend who loves cats (obviously!) and who has two black and white cats of her own.  


Cosy cat hot water bottle cover

Hot water bottle cover in Cat and Mouse fabric

As usual, I took the time to pattern match the design – mis-matched tails and paws would not sit right with me – and machine quilted the cover with an all-over diagonal pattern.
 
Cosy cat hot water bottle cover

Hot water bottle cover in cat and mouse fabric

Kona solid in charcoal was used for the bias binding whilst the green fabric is the secret surprise (who doesn’t love those?) on the inside. And it is beautifully soft and warm, being made from 100% cotton.  


My friend loved her hottie cover and will use it every day.  It’s the perfect gift to warm the body and the heart. 

Travel cupcakes

During September I enjoyed an extended visit from one of my nieces.  She arrived from Australia at the end of August with her primary objective being to “swan around” beautiful places.  She had a pretty full itinerary, taking in London, Bath, St Ives, Paris, Florence, Venice and Monaco.  All great choices if beautiful places are where you want to be.

As a welcome gift, I made her these travel-themed cupcakes.
Travel=themed cupcakes

Travel cupcakes

Thankfully, she didn’t need the map during her trip (Professor Google was a more accurate alternative – until the internet connection went down – oh, no!).   She also had a much more reliable form of transport than a sugar aeroplane (although not necessarily a tastier one).

The best thing about edible gifts is that there is no need to find room for them in an already bulging suitcase.  Her case may have arrived flat however it certainly went back more rotund, filled with lovely treasures from her overseas trip.

When it rains, look for rainbows

Is there anyone who doesn’t love rainbows?  They are so beautiful; a symbol of hope and a promise of better things to come.
 
Rainbow over rooftops

Rainbow over rooftops

The beautiful colours of Fancy by Lily Ashbury simply lent themselves to a rainbow quilt.  Even the press information about this collection described it as being like “rays of sunshine on a cloudy day” and “gorgeous, lush, and drenched with colour”.  


The collection was missing a purple so I hunted though my fabrics to find something suitable.  This was harder than it might seem as purple, particularly a dark reddish purple, is not a common colour in quilting fabrics (they seem to tend toward lavender and bluish purples).  Thankfully I found two.  

Purple fabrics

Purple fabrics

The sharks tooth is a fabulous match as the pattern mimics others in the Fancy collection.  The second had little birds on it.  At first, I wasn’t sure if this would really work with the other fabrics.  But then I remembered that in the song, “happy little bluebirds fly beyond the rainbow” so it was obviously meant to be.  


The spectrum of colours made a coin quilt design an obvious choice for me.  I had so much fun making my last off-set coin quilt, I decided to use this as the basis for my rainbow quilt.  For this quilt, I used a jelly roll and simply removed any duplicate fabric strips.  The fabrics were used in the same order they were presented in the jelly roll and the same design was used across a row in each of the five columns.  A Flurry spot (Dashwood studios) in light teal was the perfect choice for the background.   


I had no dilemmas about what to use for the backing fabric.  It just had to be unicorns.  I mean, what else would you expect to find behind a rainbow?  Visitors to my Bucks Open Studios event were asked to help me choose which unicorn fabric to use.


Unicorn fabric from Far Far Away collection

Unicorn fabric by Heather Ross

It was an even split between the green and the purple colour ways of this lovely whimsical design by Heather Ross from her Far Far Away collection.


In the end, the decision was taken out of my hands as I could only source enough of the green colour way to complete the backing. Either one would have worked however the green is a beautiful, soothing colour that is the perfect counterfoil for the riot of colours on the front. 


The lovely, swirly Curlz (it’s my favourite) was used as the quilting design and a glorious sunshine yellow from the Linen Cupboard collection was chosen for the binding.


Off-set coin rainbow quilt

Off-set coin rainbow quilt


This cuddly, warm quilt in cheerful, sunny colours cannot fail to  banish dark days and rainy skies.  

Cycling cupcakes

Cupcakes aren’t just for girls.  Men like cakes too and manly-themed cupcakes are great fun to make.  When decorating cakes I love creating designs that will have special meaning for the recipient – either highlighting a hobby or featuring some of their favourite things.


These chocolate cupcakes were made as a birthday gift for a man who – can you guess? – loves cycling.  


Bicycle cupcakes

Cycling cupcakes

He enjoys following the Tour de France (the yellow jersey) whilst the rosette and gold cup highlight his success in competitive cycling. Early in his career he worked as a bike mechanic – as represented by the handy tool kit.  


The bike might look a bit rubbish however this was deliberate as it is a representation of his first racing bike.  When he started competitive cycling, his first bike was a broken down standard bike and not a specialist racing bicycle.  He painted it black and called it his “black hack”. Despite its humble heritage it was still a winner as he rode it to many victories before trading up to a proper racing bike.


No doubt you are now wondering, ‘Why the kangaroo?  How does that relate to cycling?’  It is no mystery really.  He is there because the recipient is Australian.  


Happy birthday, Skippy.  Hope you had a great day!  


(Note: the kangaroo design in based on a card tutorial I found on Pinterest.  If you are the designer, please let me know so that I can formally acknowledge your work).

Festival of Quilts – a picture post

On Sunday I made the journey to Birmingham (UK) for the Festival of Quilts.  It was almost overwhelming seeing so many gorgeous quilts on display (not to mention the shopping opportunities – but more on that at another time).  Rather than give an overview of the show, I thought I would share some of my favourite quilts.  They may not have been THE prize-winning quilts however they were all winners in my book.  

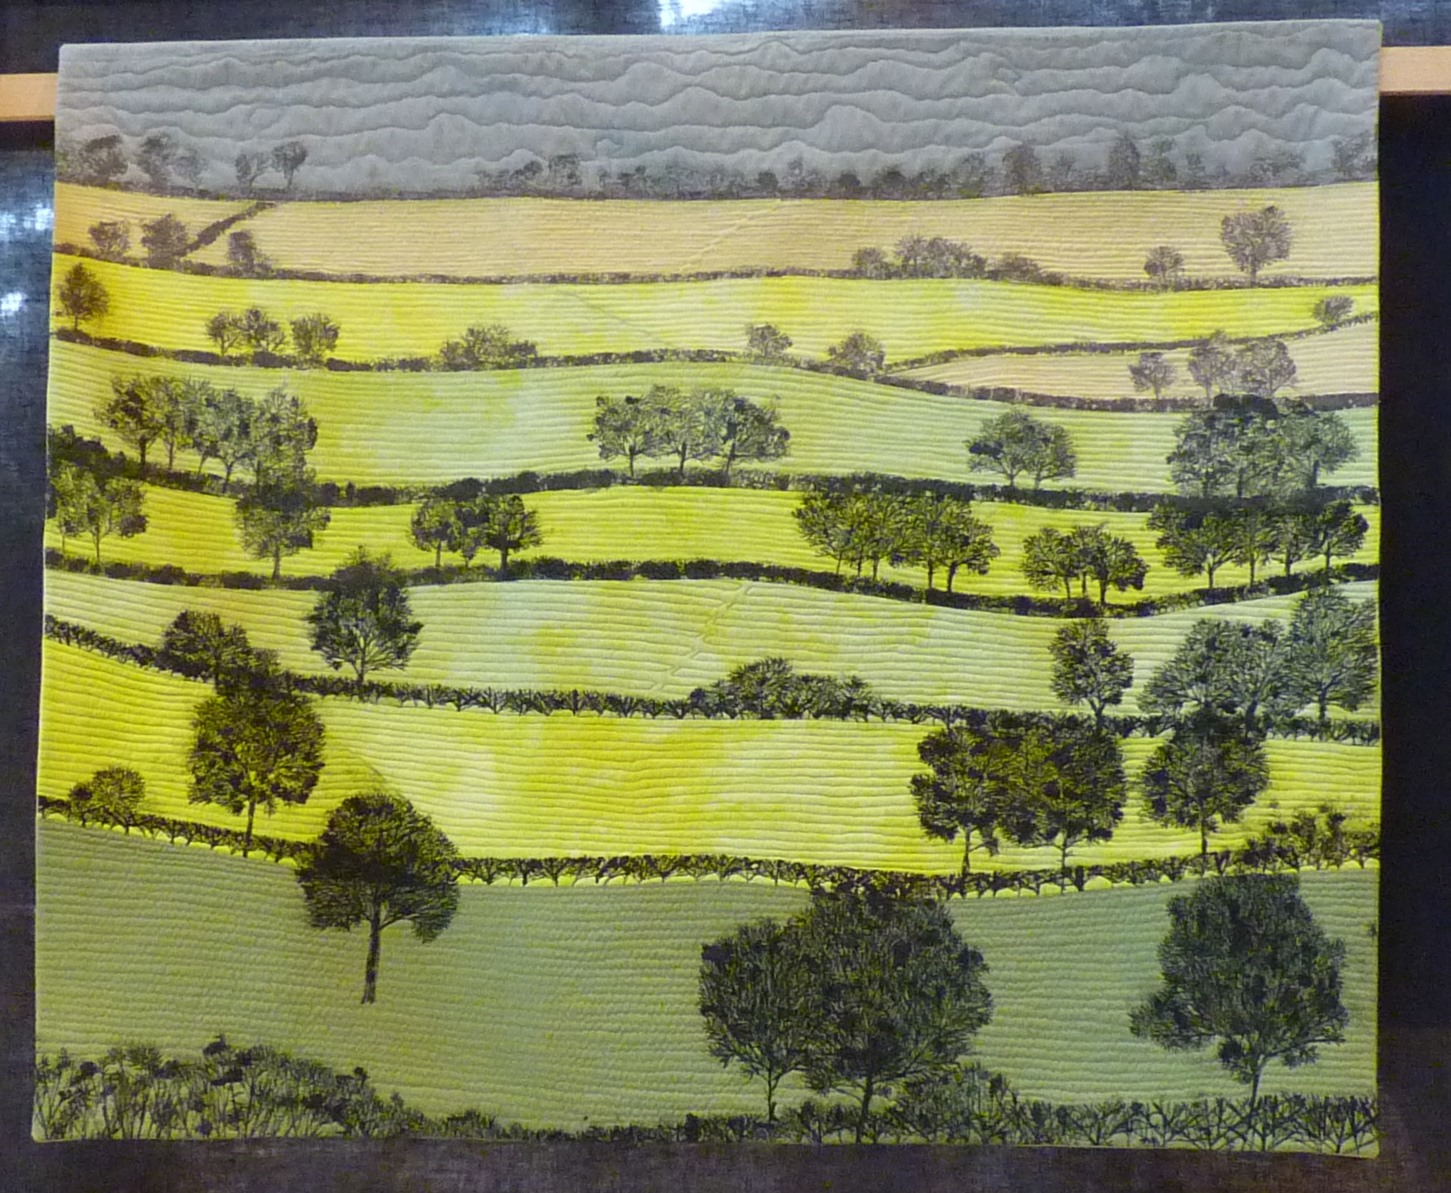
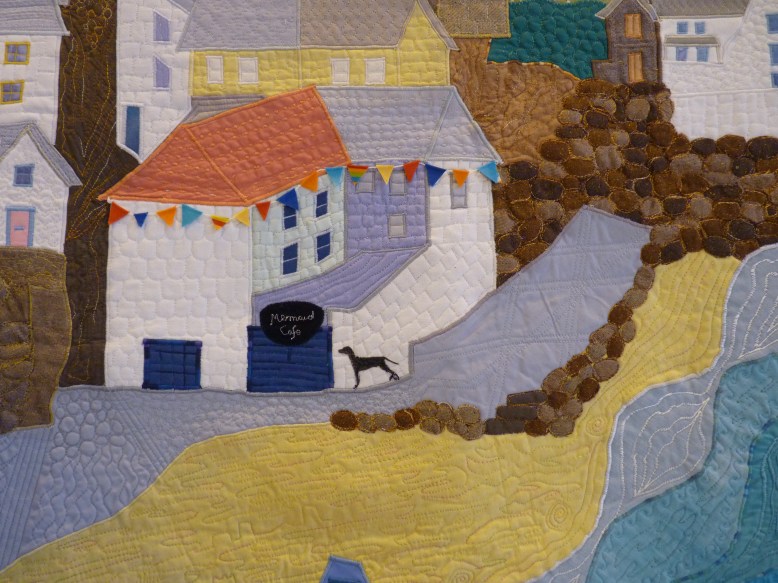
I loved the calm serenity of this quilt from the pictorial quilts section.

Quilt 67 - Marshwood Vale by Kate Dowty

Quilt 67 – Marshwood Vale by Kate Dowty

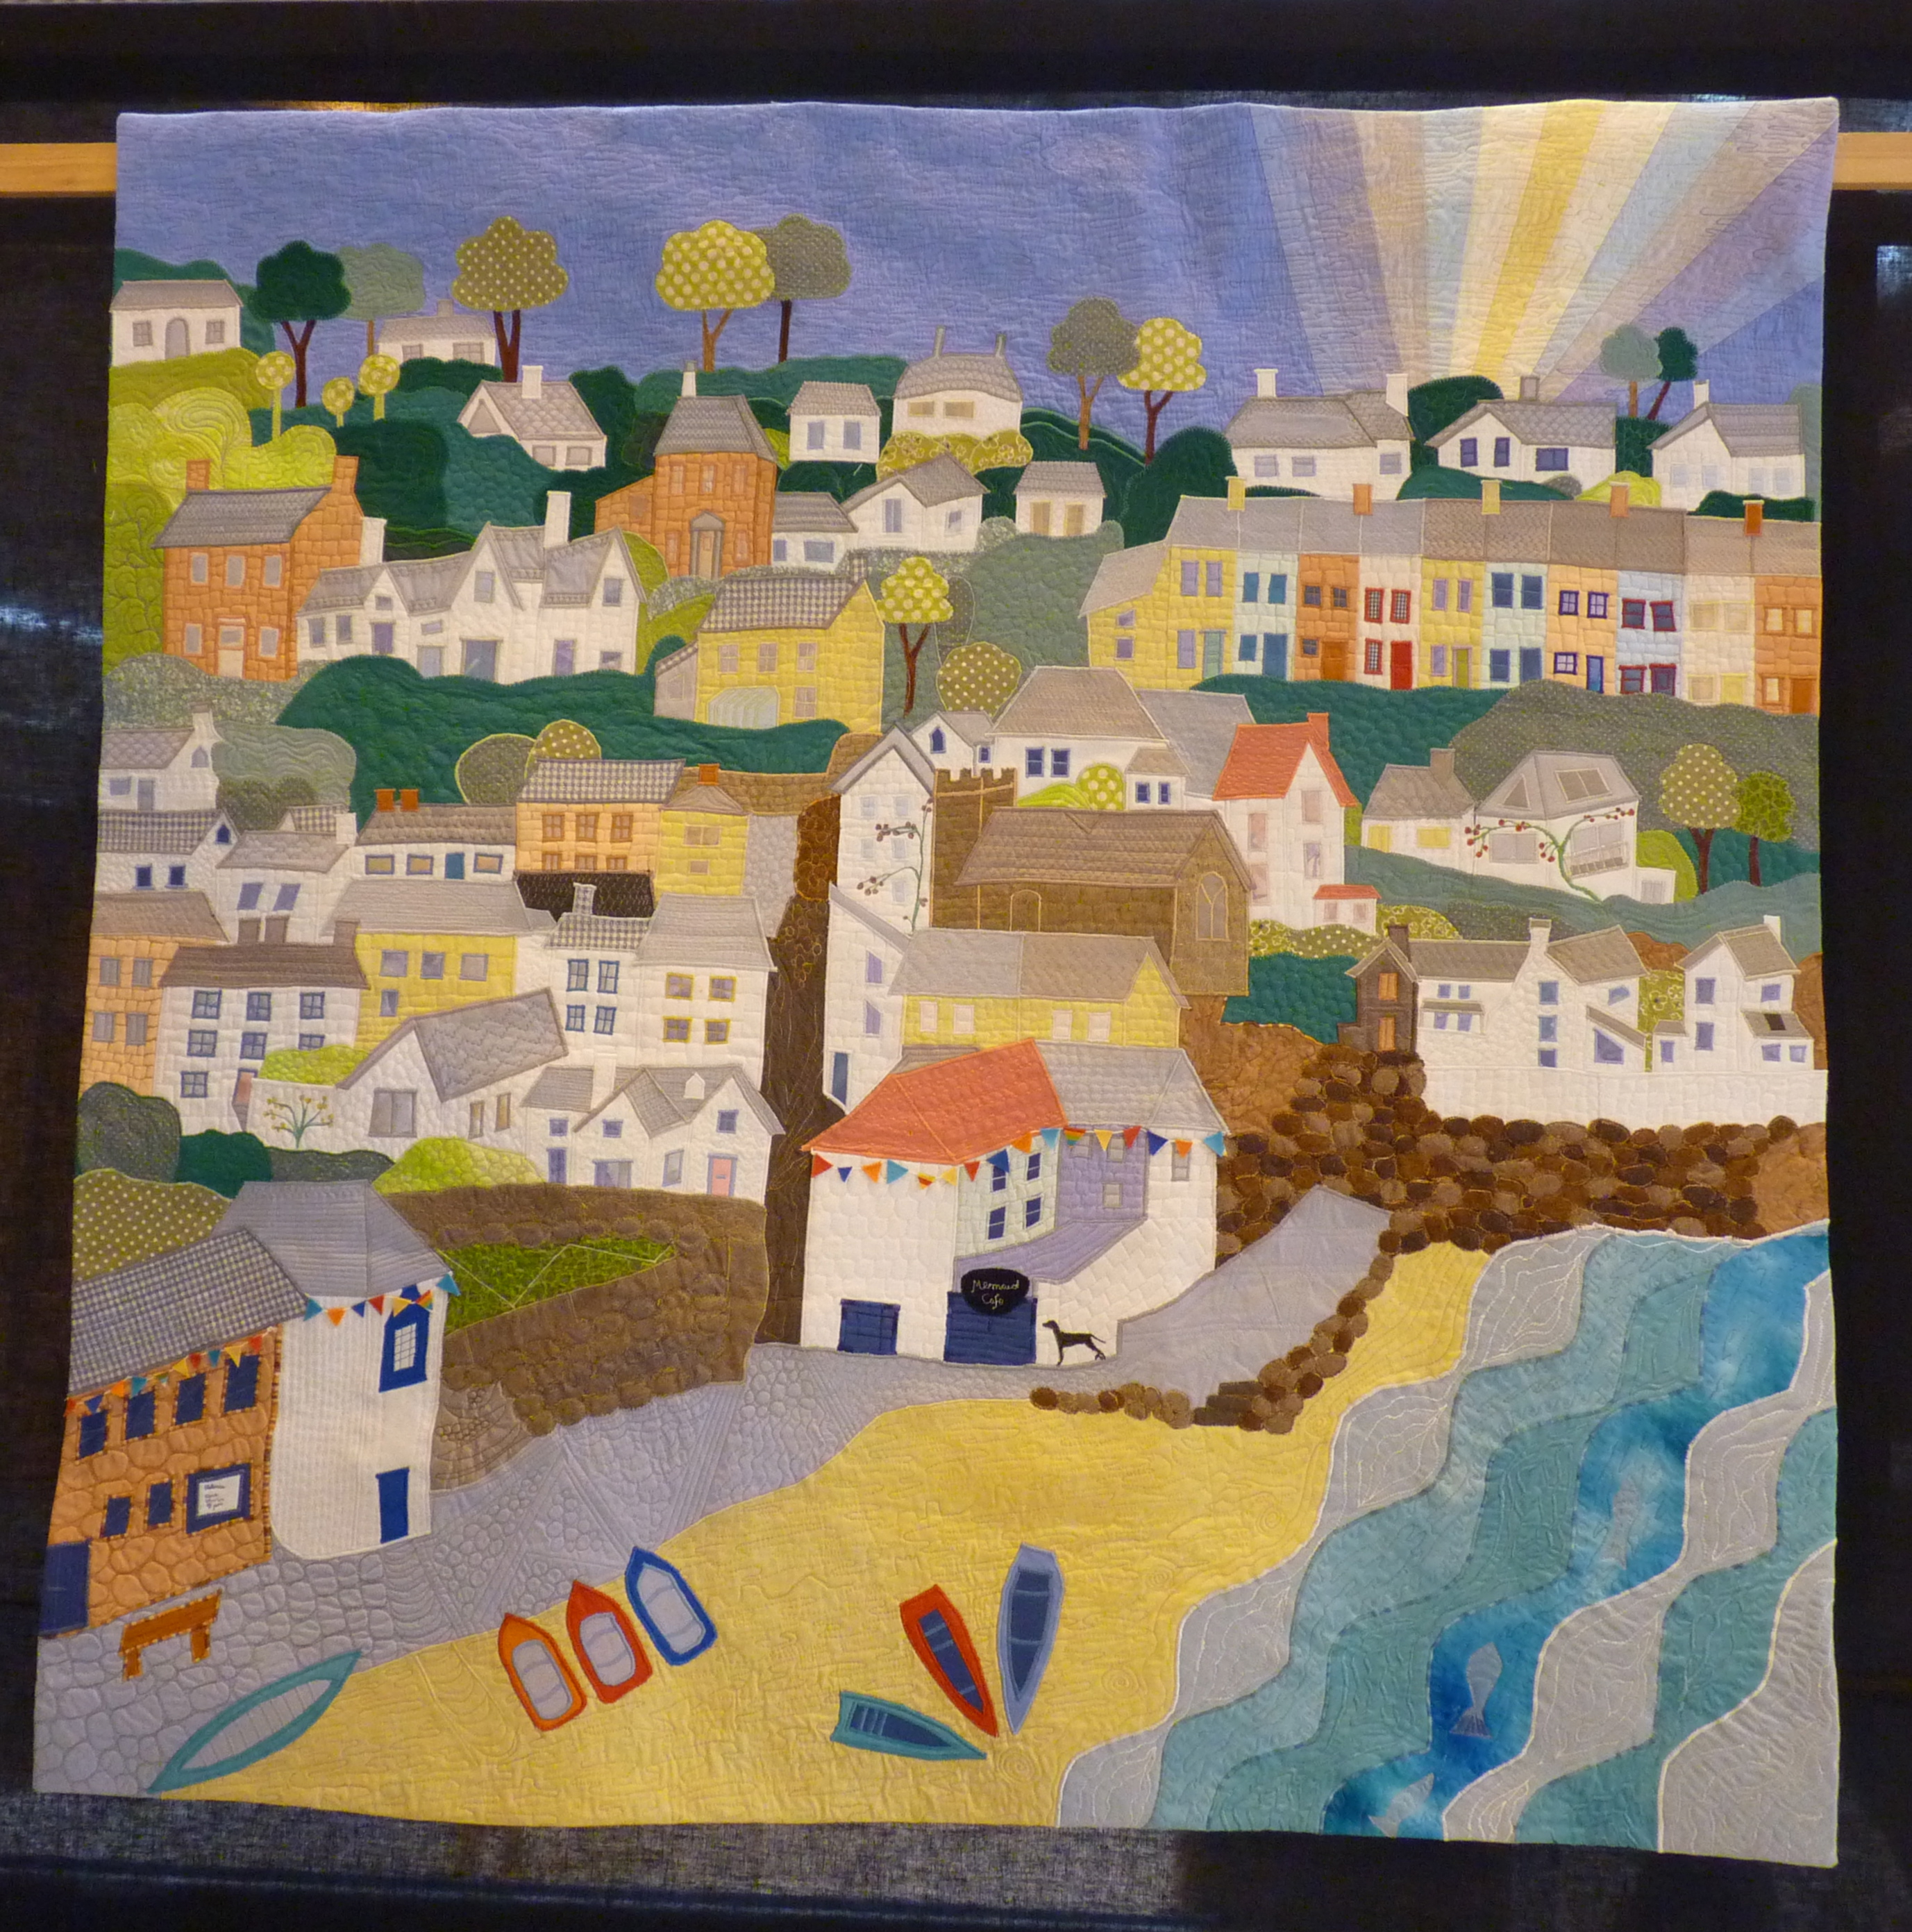
The sunny outlook and bright colours of this pictorial quilt I found very appealing.  You could find something new in this quilt each time you looked at it.

Quilt 60 - Good Morning Gorran by Brenda Thomas

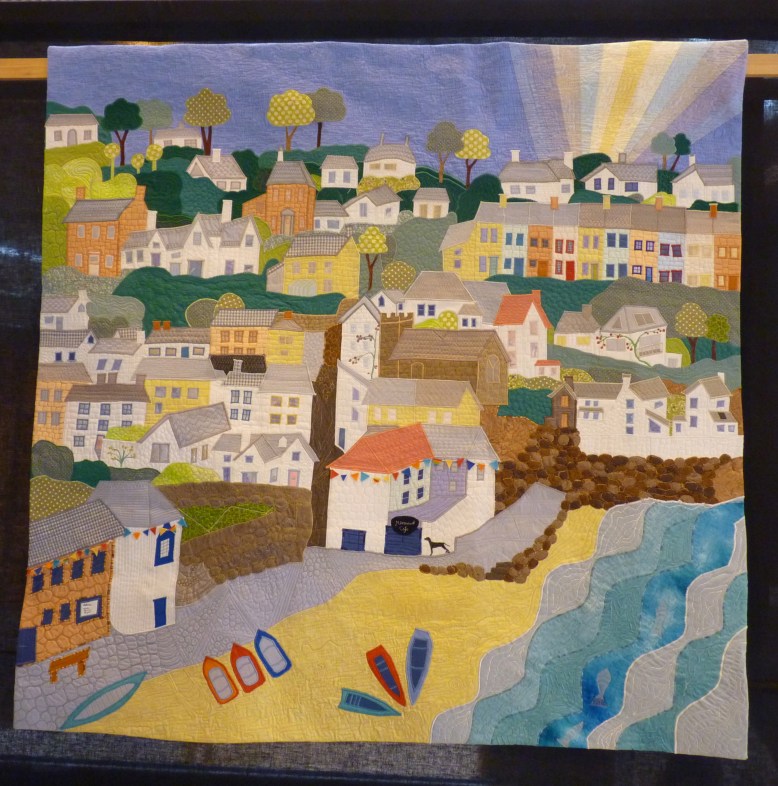
Quilt 60 – Good Morning Gorran by Brenda Thomas

This close-up shows the amazing detail – all done a small domestic sewing machine.  Respect!

Quilt 60 - Good Morning Gorran (detail) by Brenda Thomas

Quilt 60 – Good Morning Gorran (detail) by Brenda Thomas

Here is one of my favourites from the contemporary quilt section.   A quilt covered in little dresses.  So cute!  And I loved the hats and shoes quilted in the background.  Can never have enough of those.

Quilt 718 - Nostalgia by Jannie Bloemers

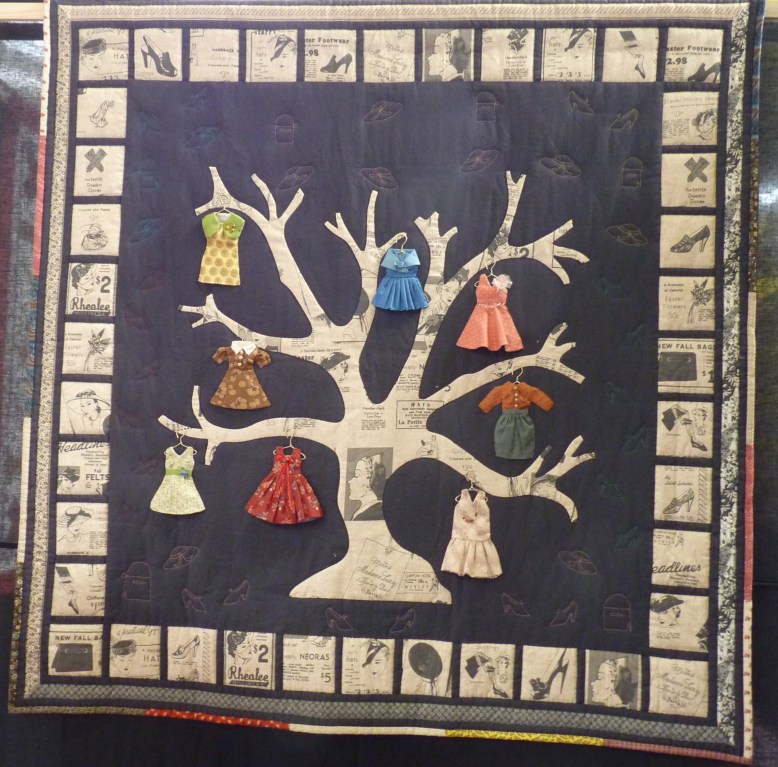
Quilt 718 – Nostalgia by Jannie Bloemers

Quilt 718 - Nostalgia (detail) by Jannie Bloemers

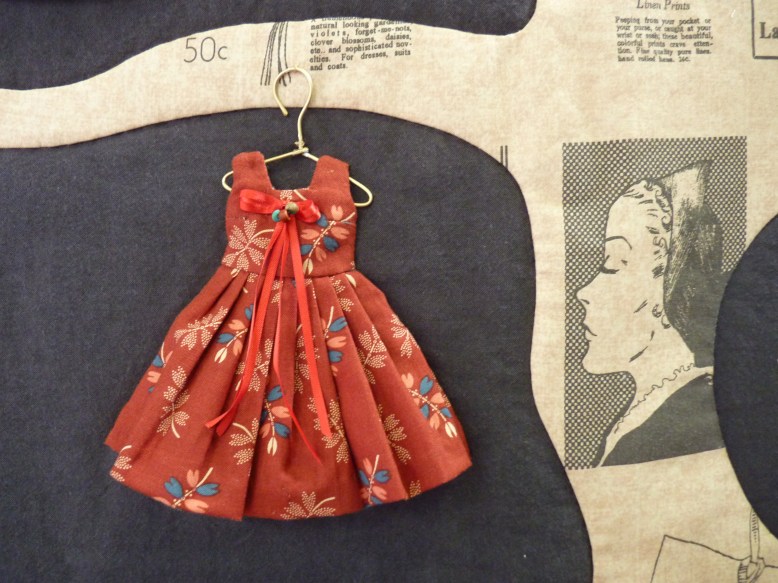
Quilt 718 – Nostalgia (detail) by Jannie Bloemers

This quilt by Andy Brunhammer from the Art Quilt Category looked fairly nondescript until you looked at it through a camera.  Suddenly, the image revealed itself as the face of a sleeping woman (Bette Davis, no less).  How is this effect achieved?  I have no idea although it has “something to do with pixels”.  

Quilt 563 - Sleep Jezebel by Andy Brunhammer

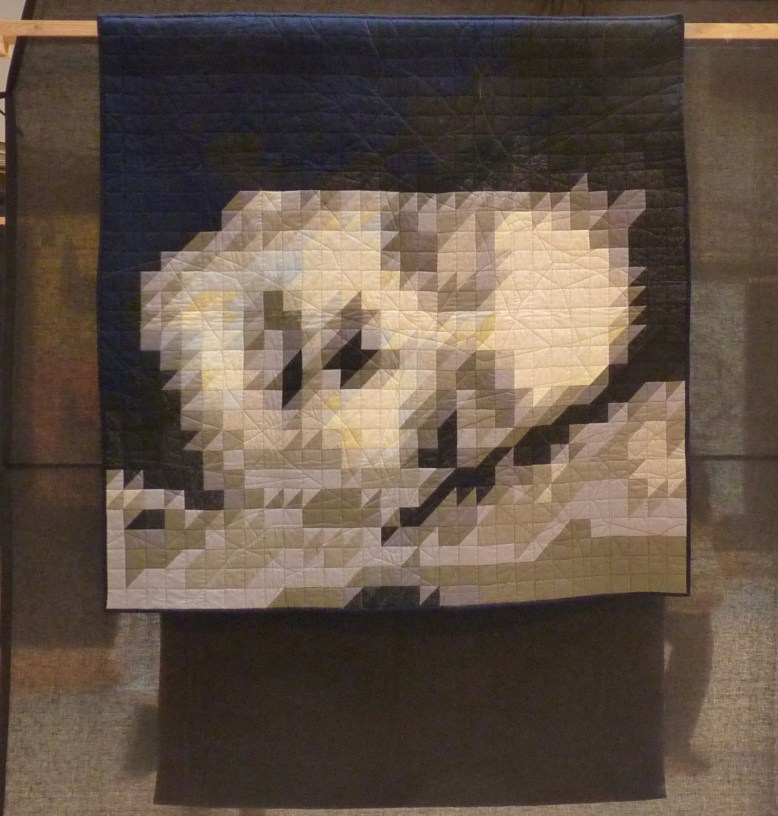
Quilt 563 – Sleep Jezebel by Andy Brunhammer

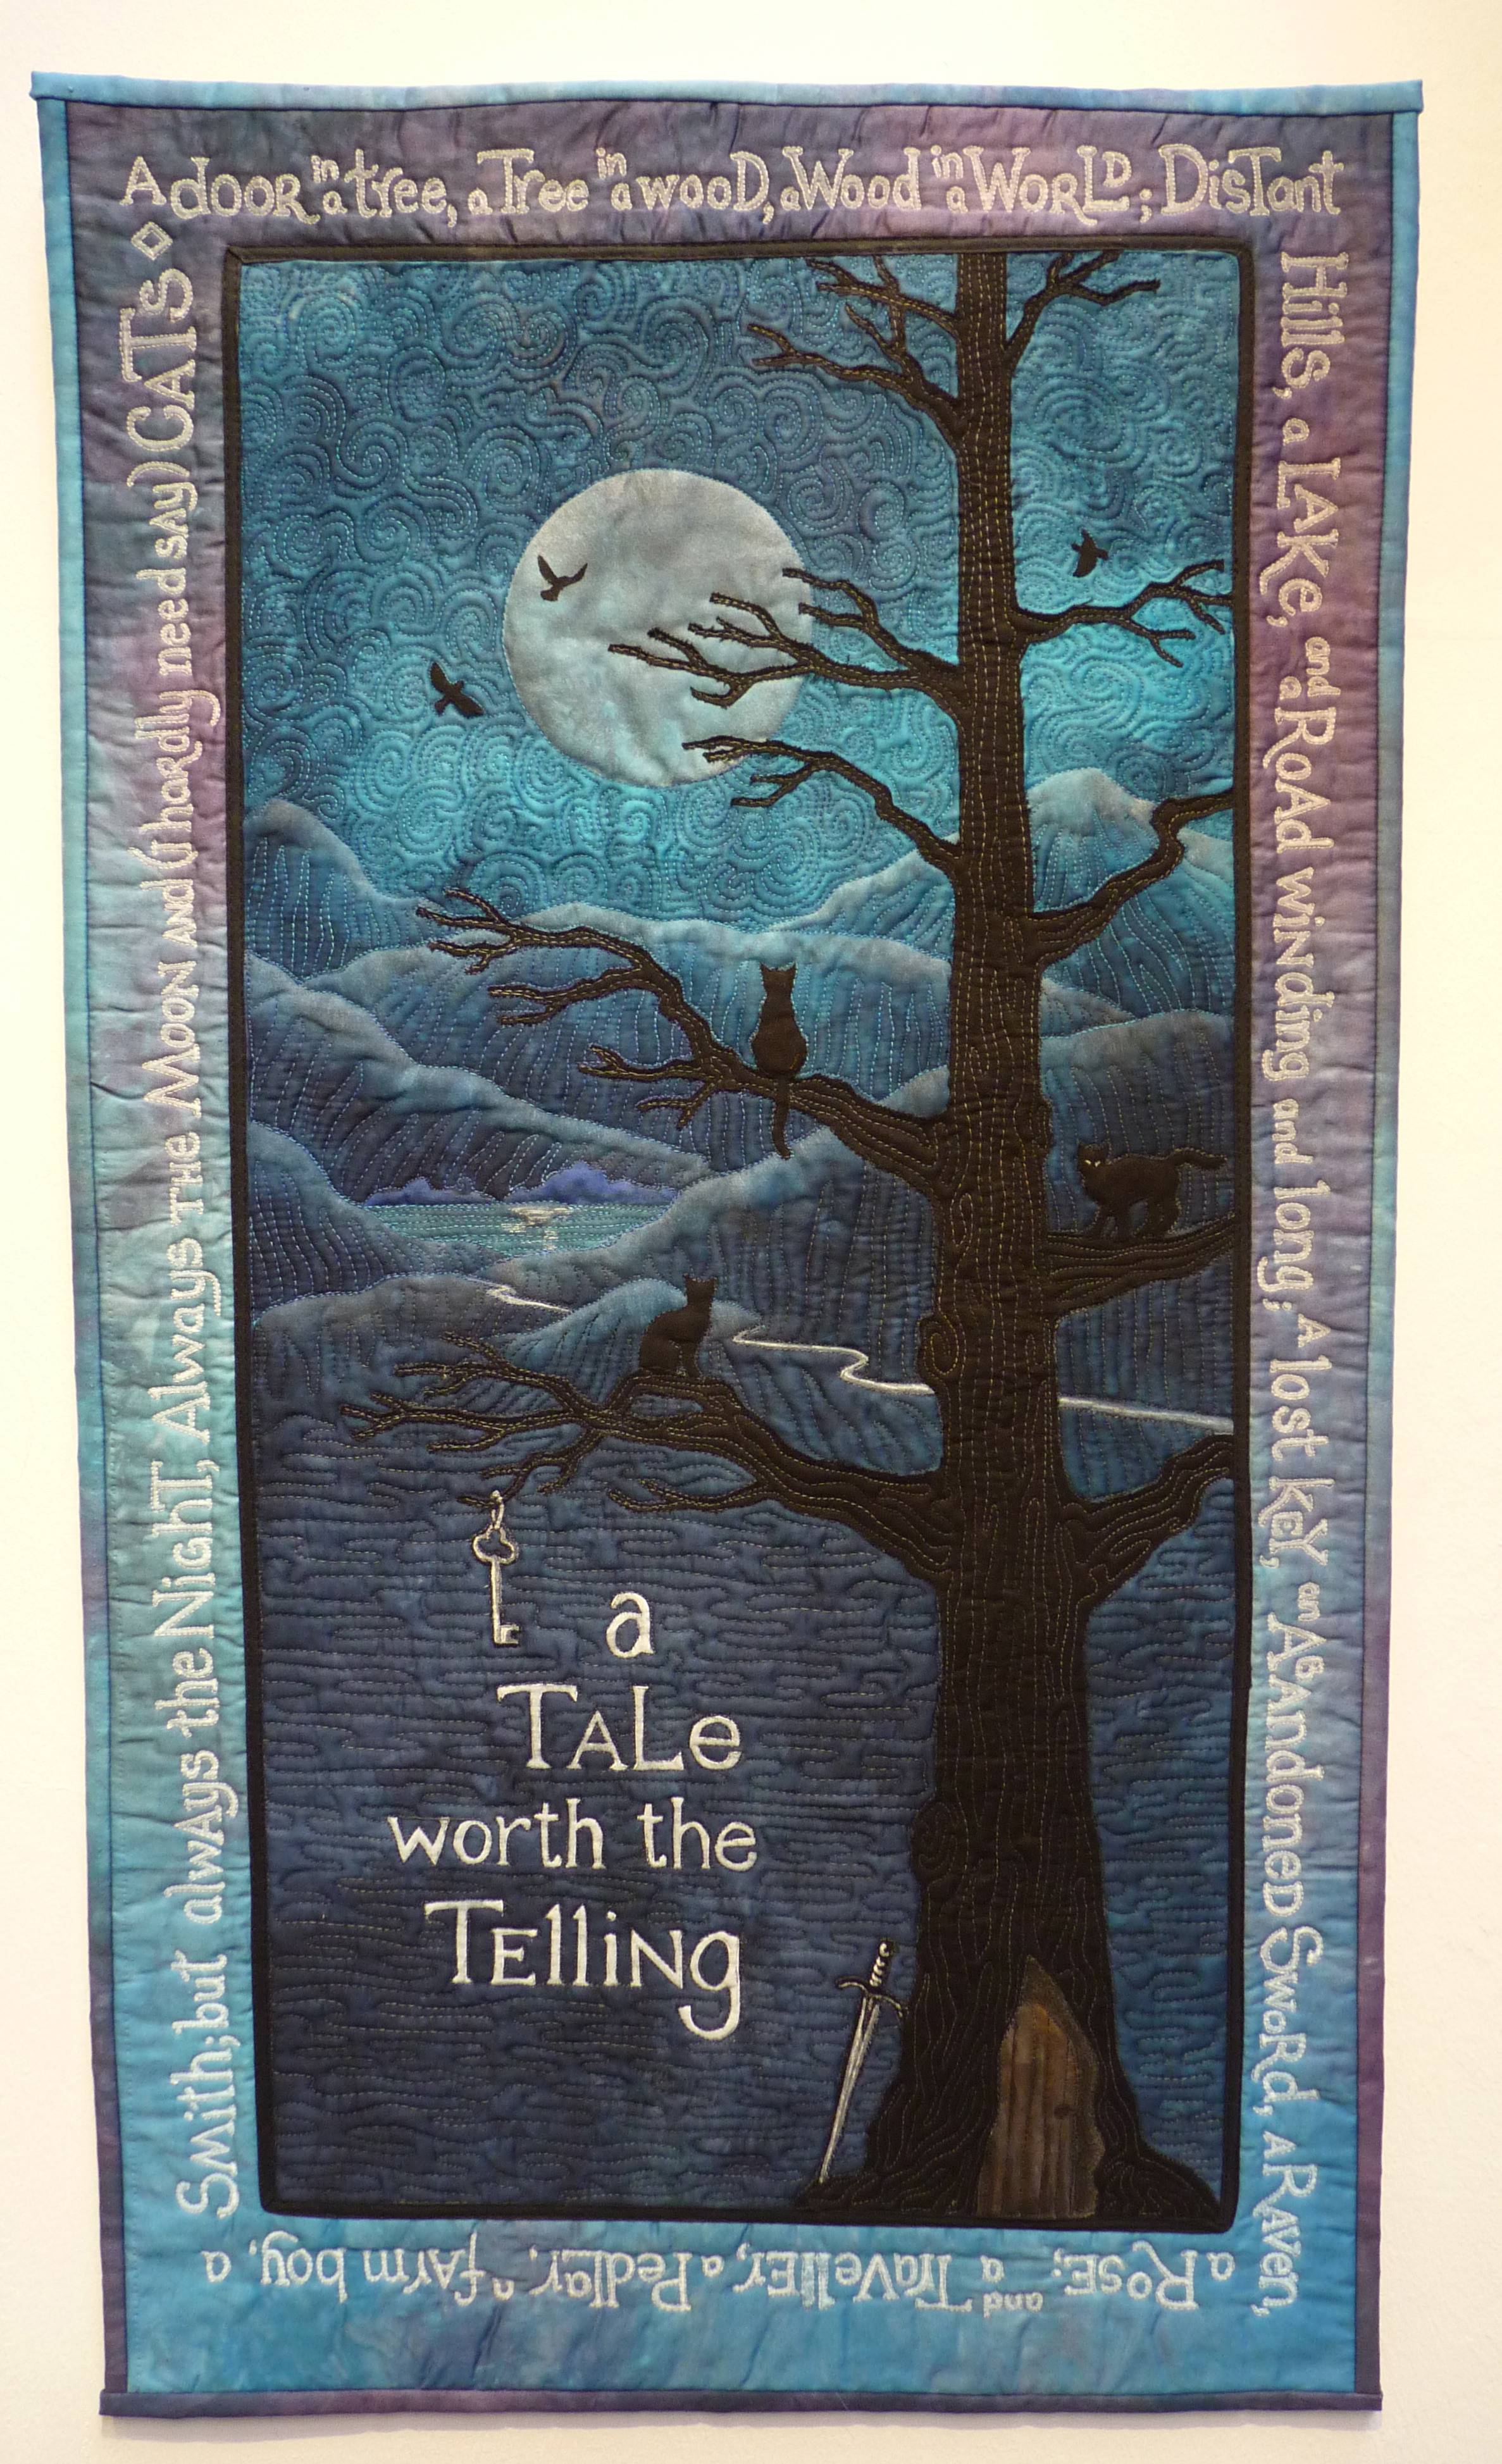
I loved this tiny quilt by Joanna O’Neill.  It reminded me of the seven basic plot outlines – wo/man against something/someone, rags to riches, a quest and so on.  It is now difficult to think of a book that would not be improved by the addition of at least one cat.  

Quilt 8 - A Tale Worth Telling by Joanna O'Neill

Quilt 8 – A Tale Worth Telling by Joanna O’Neill

As lovely as these quilts were, I still prefer a quilt that can be used as more than a decorative piece.  I like quilts that keep you warm at night, share your picnic and that you can hide under during the scary bits in Dr Who (I still have nightmares about those statues!).  
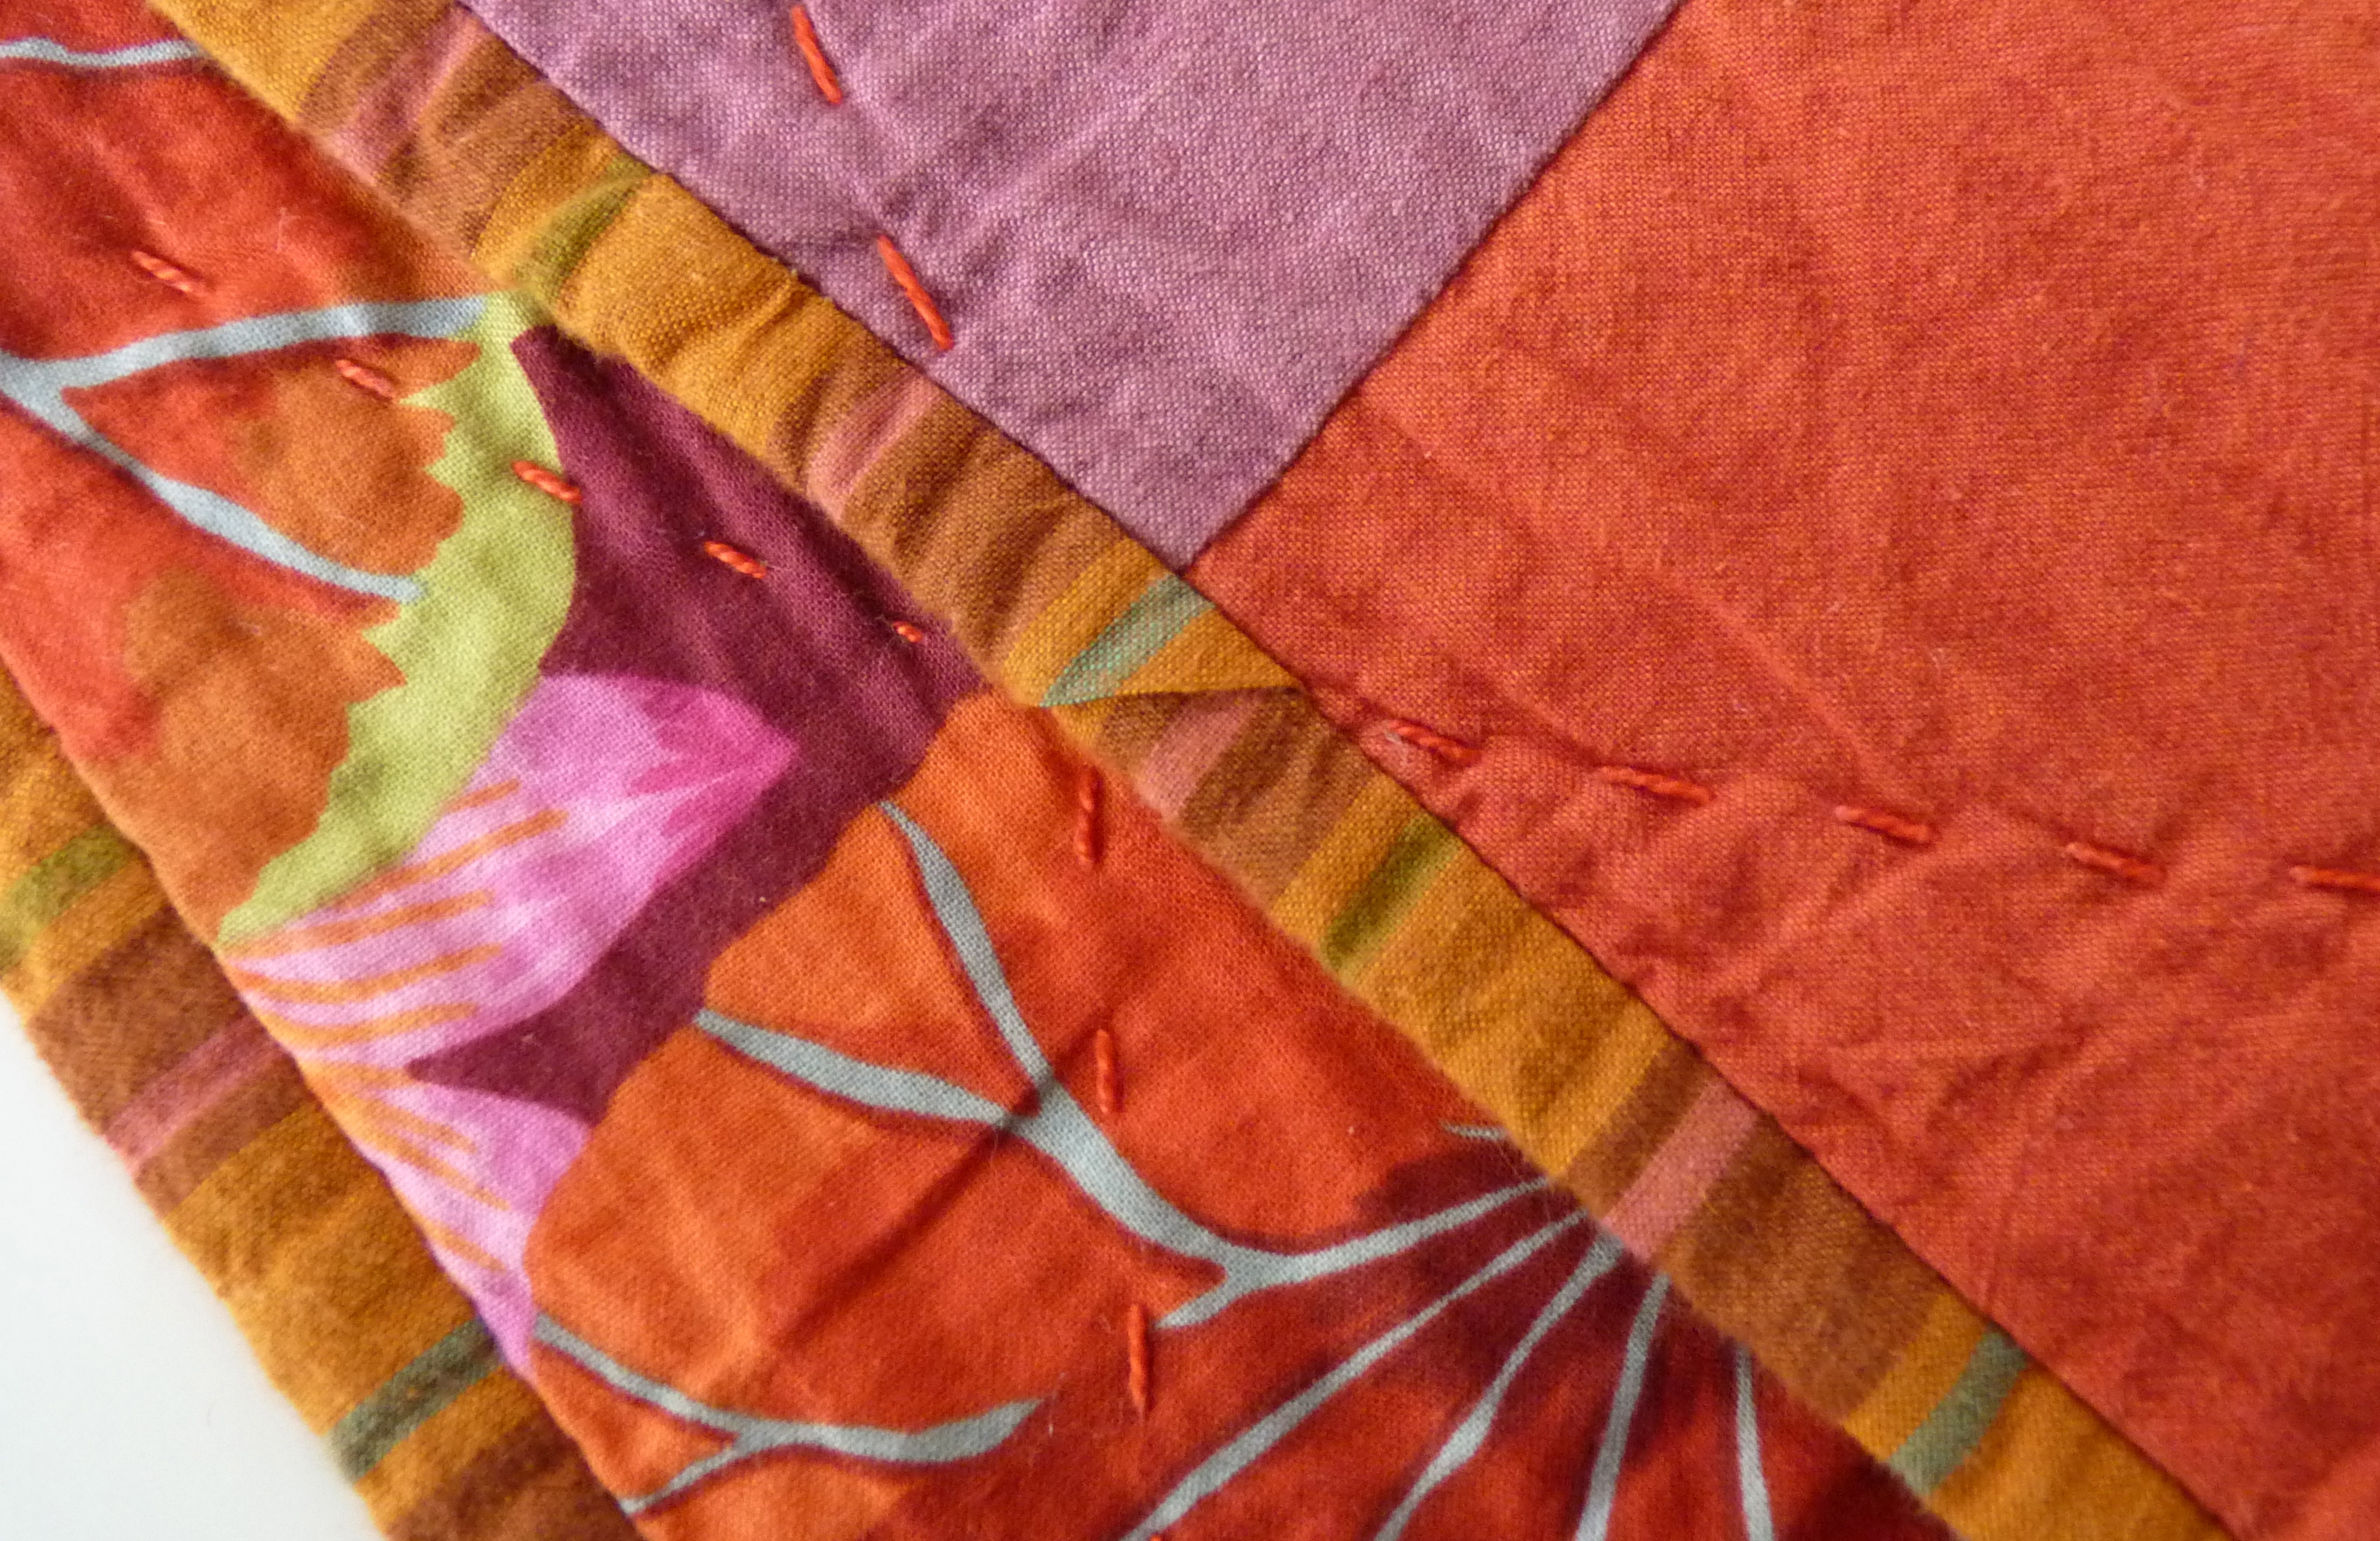
This scrappy quilt, in which “no yardage was harmed in the making” was a delight.  Such a glorious collection of colours.

Quilt 327 - No Yardage was Harmed in the Making of this Quilt by Alison Robins and Krista Withers

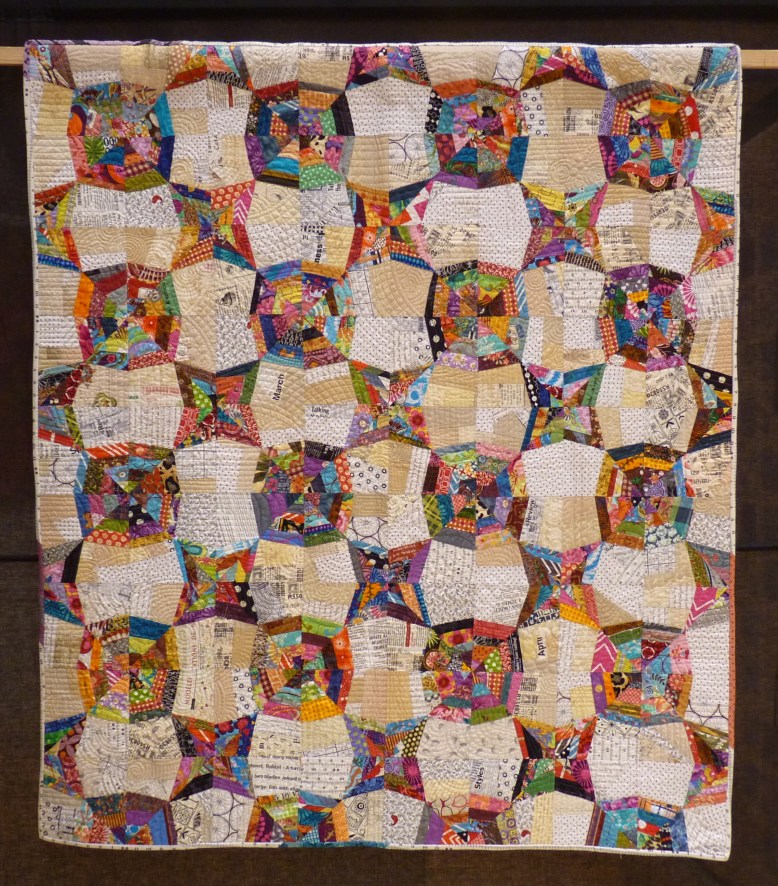
Quilt 327 – No Yardage was Harmed in the Making of this Quilt by Alison Robins and Krista Withers

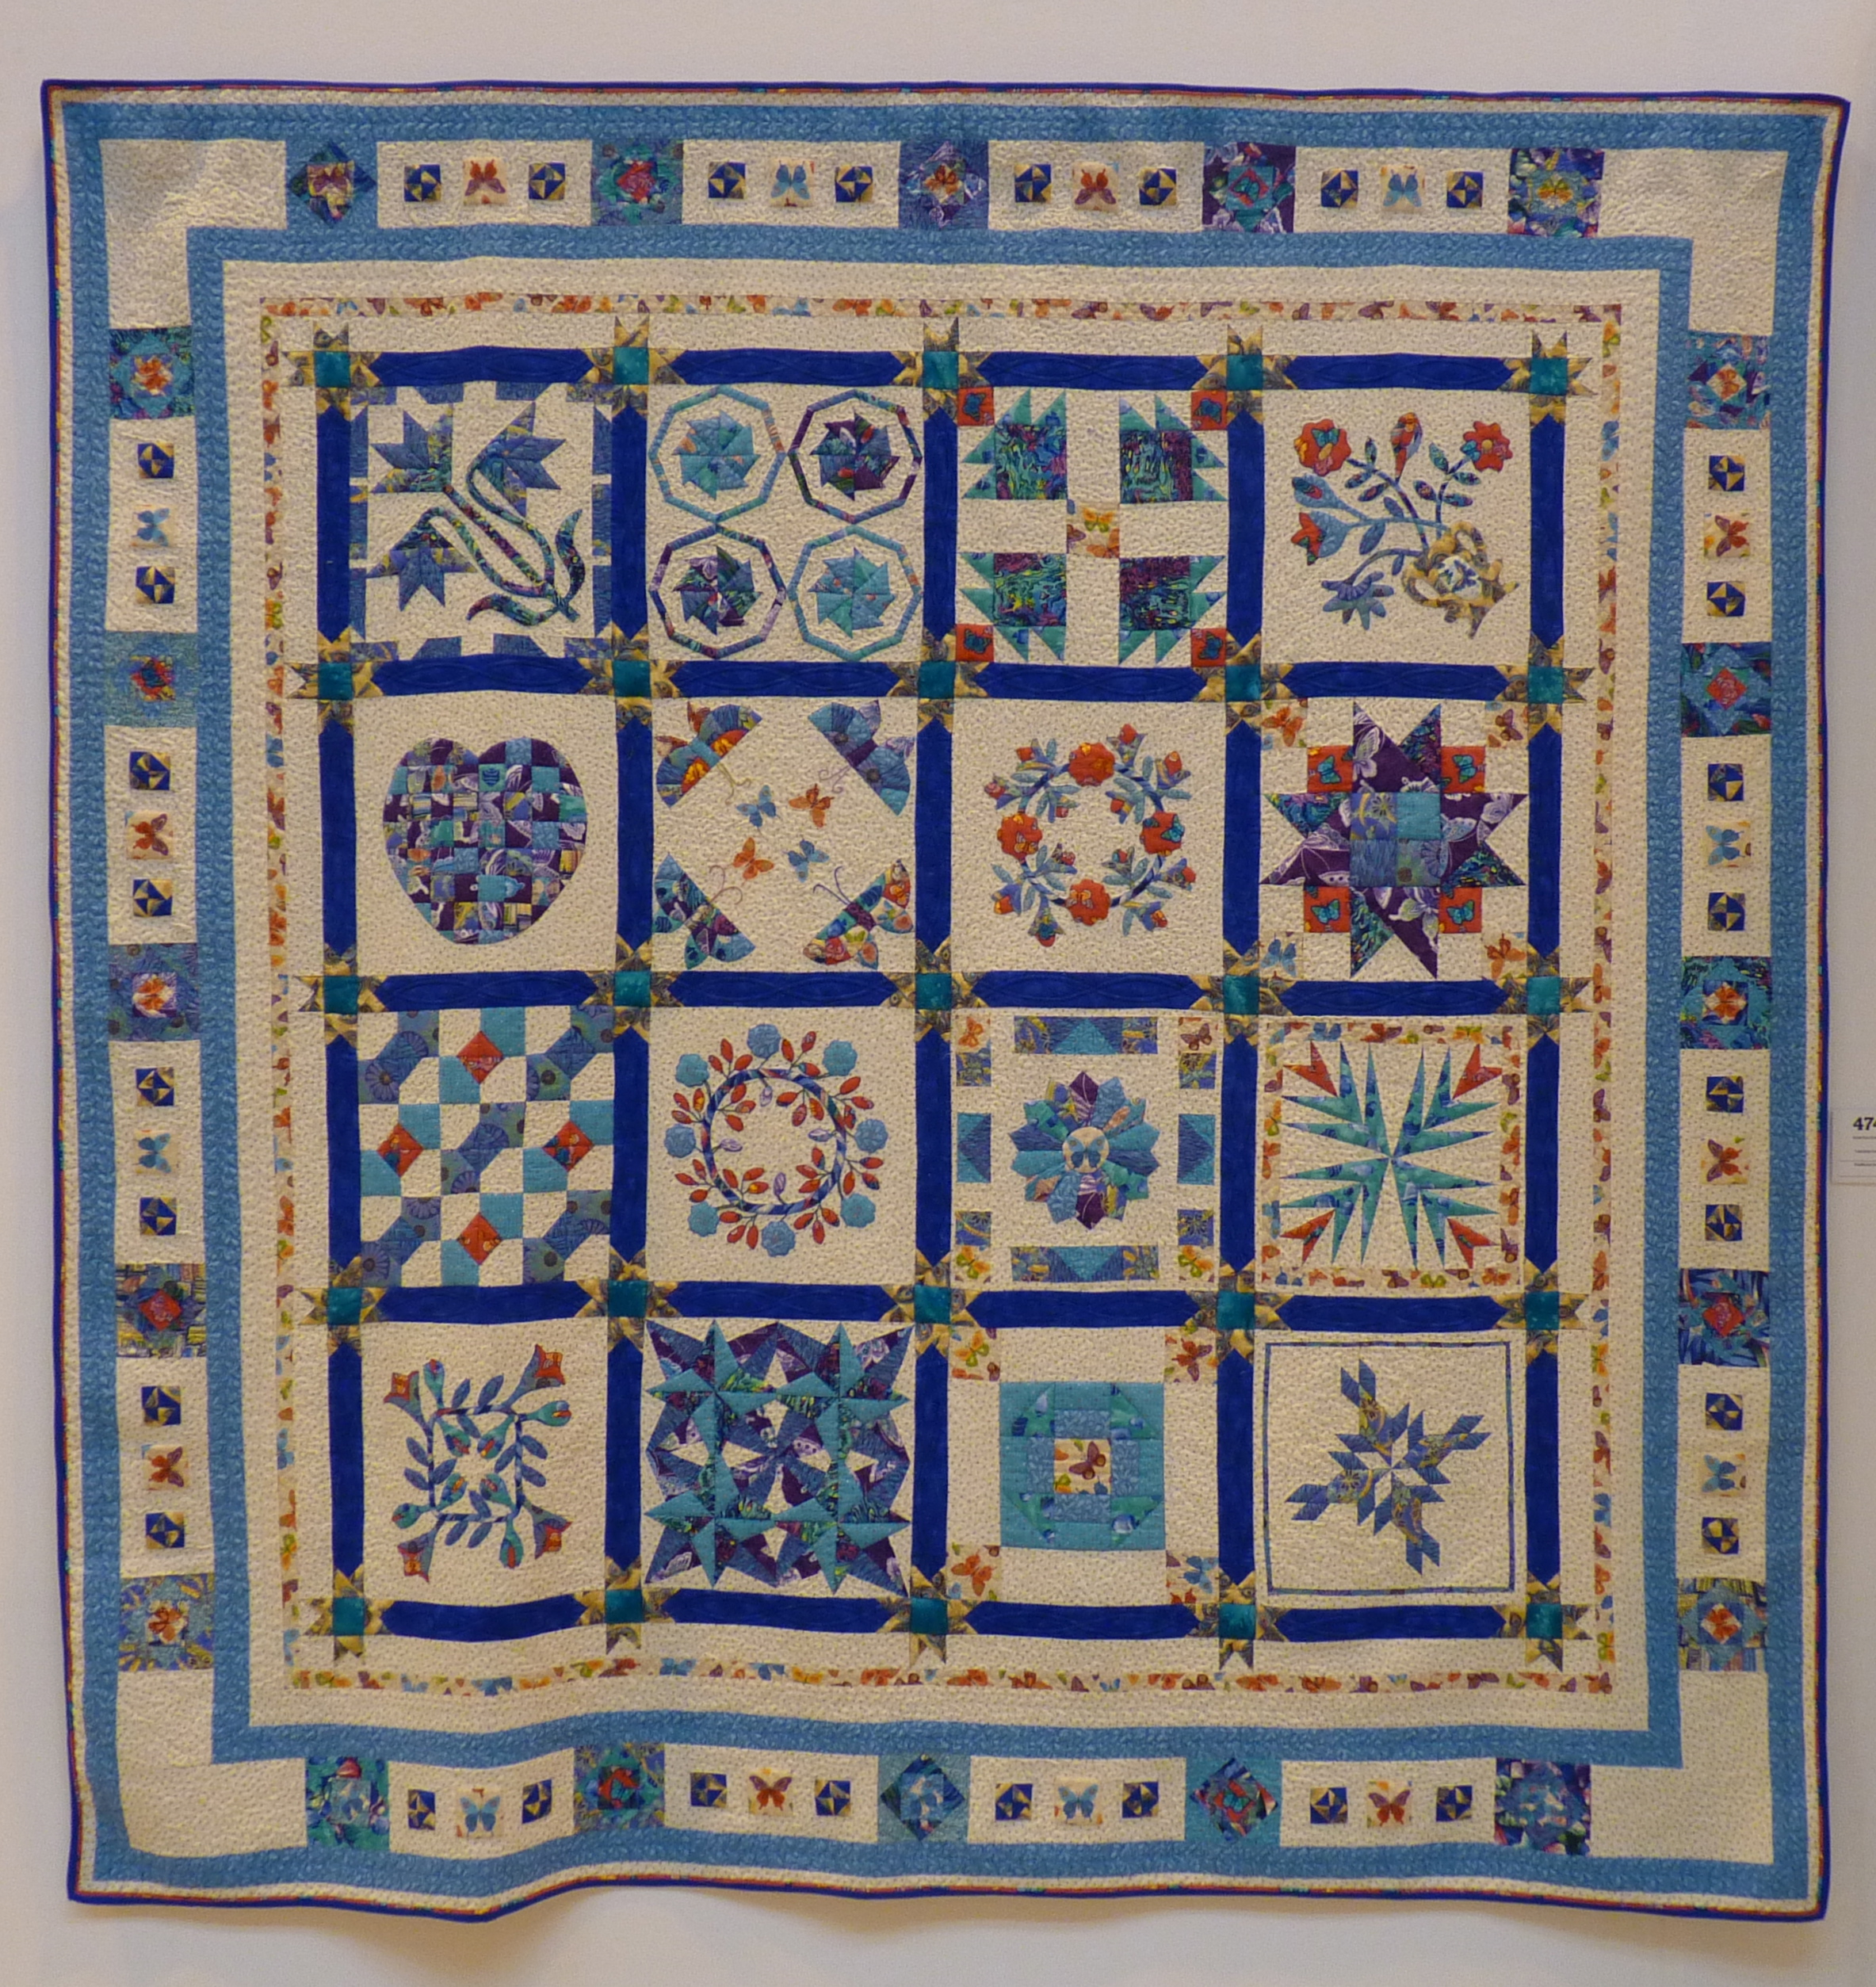
I also loved the blues and metallic gold fabrics used in this traditional sampler quilt.  Can you believe it was her first quilt?

Quilt 474 - Learning Curve by Janet Ann Bowden

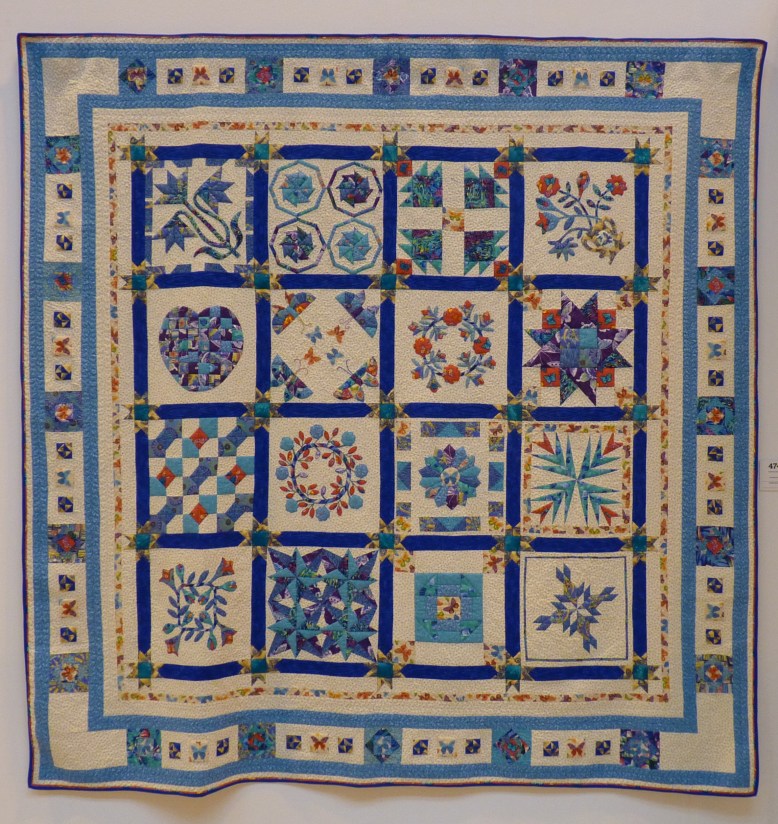
Quilt 474 – Learning Curve by Janet Ann Bowden

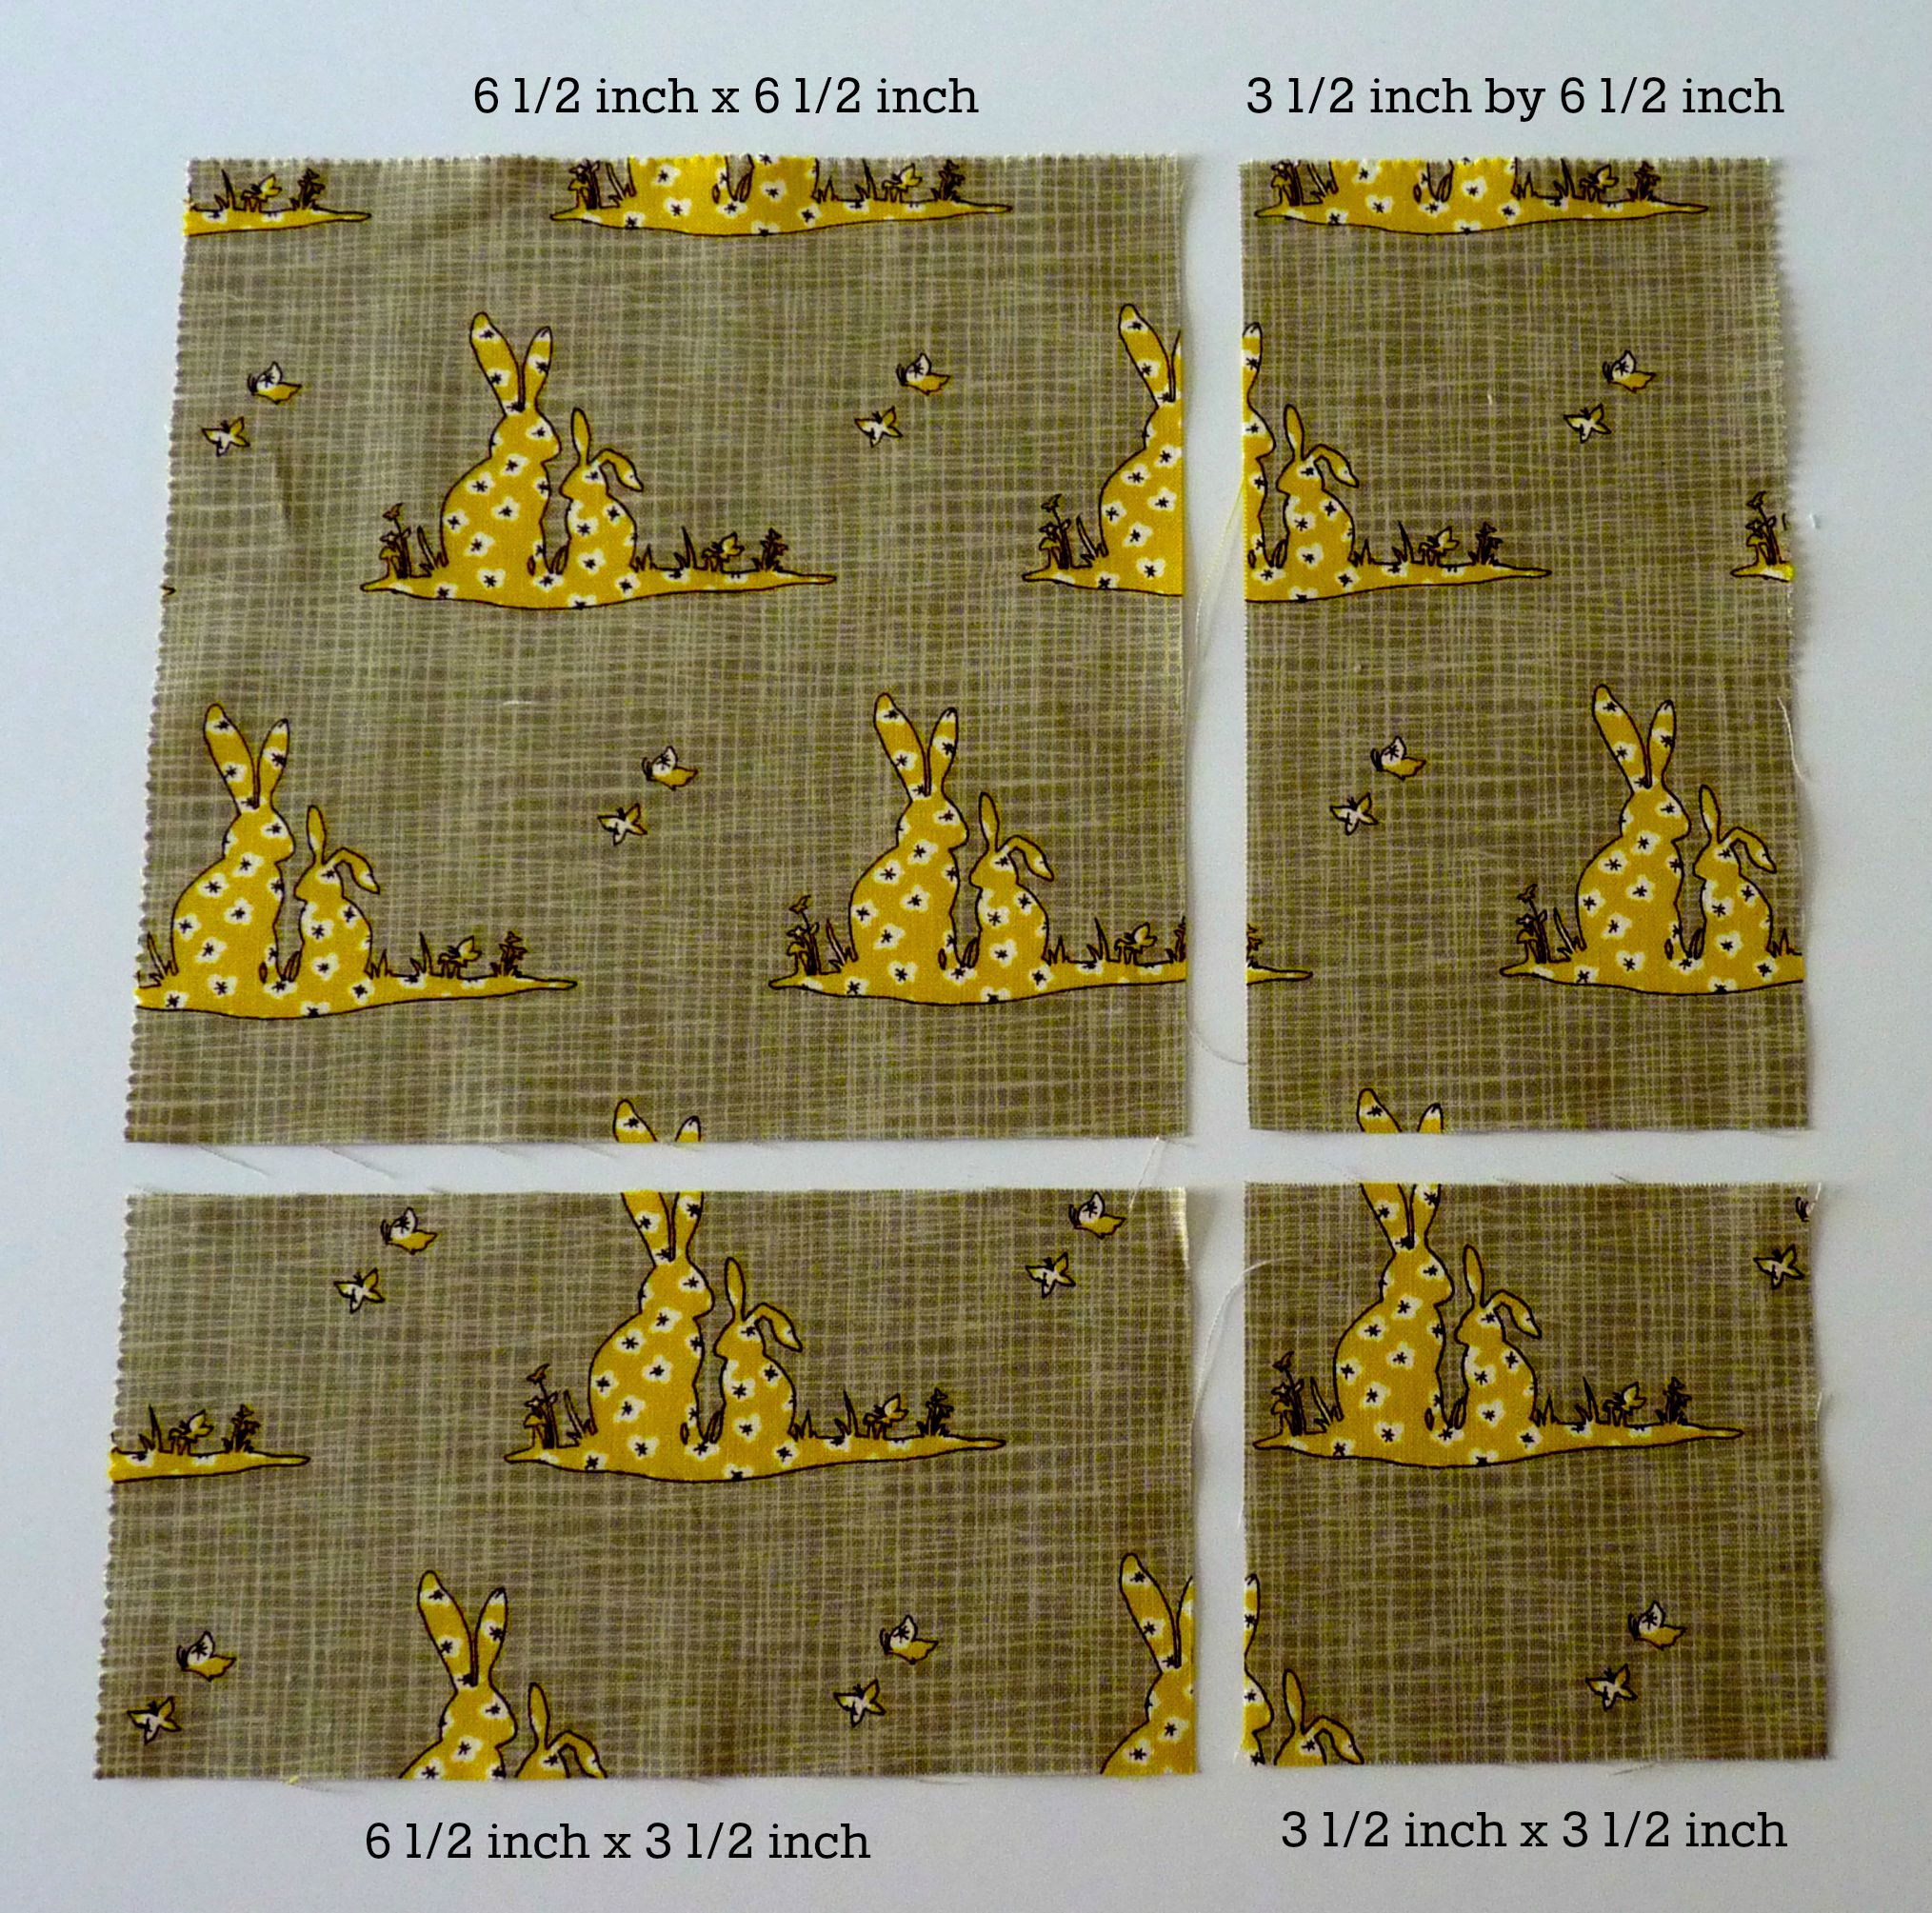
And this one with a simple but very effective design of squares and half-square triangles.

Quilt 721 - Bank Holiday by Ruth Burdett

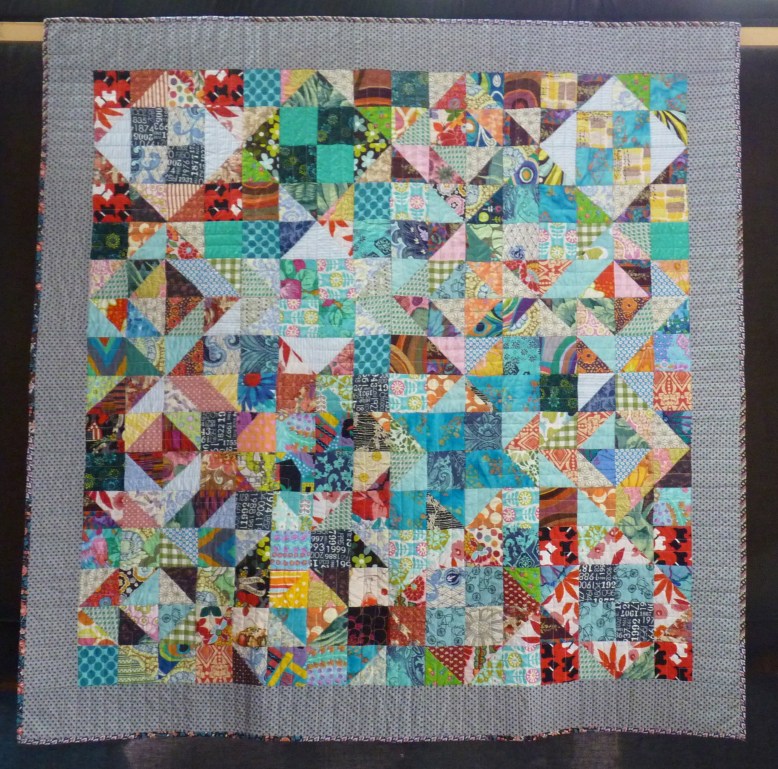
Quilt 721 – Bank Holiday by Ruth Burdett

Any of you who follow my Facebook page will have seen that I also entered a quilt in this year’s show.  Here it is on display.

Quilt 328 - Pot Luck Coins by Jen Kelson and Jenny Otto

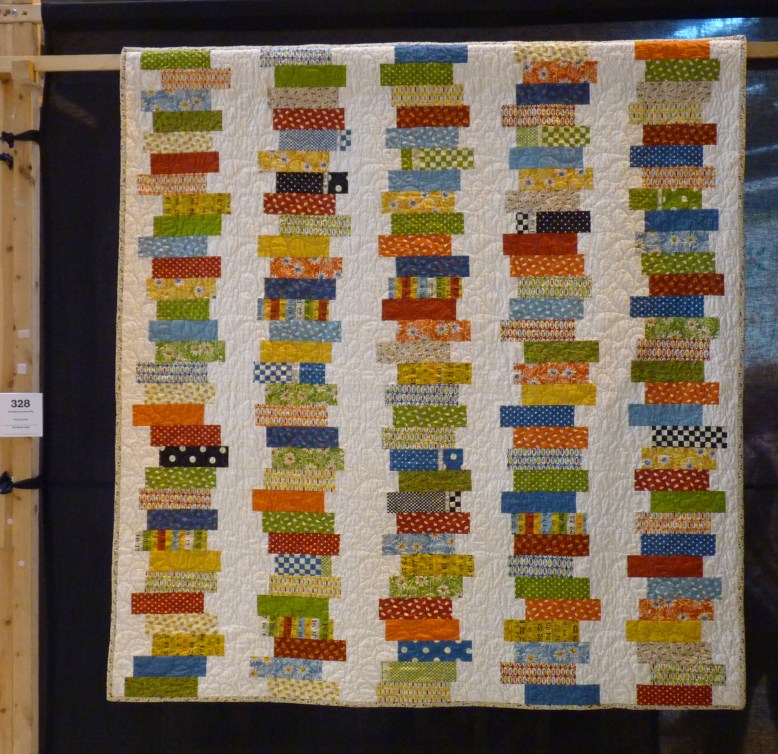
Quilt 328 – Pot Luck Coins by Jen Kelson and Jenny Otto

And I received some very nice comments from the judges too.  All in all, a great day out.    

Bluebird Park quilt – a tutorial

This quilt I made was one of the most popular at my recent exhibition for Bucks Open Studios.  I have to confess, it is one of my favourites too.  
 
Bluebird Park quilt

Bluebird Park quilt

A number of people have contacted me since asking for the pattern. The world definitely needs more quilts so here is a tutorial to enable you can make your own version.
 
What you’ll need:
1 layer cake* (I used Bluebird Park by Kate and Birdie for Moda)
0.5 metre fabric for binding
3.5 metres backing fabric (more if you need to match patterns)
Wadding or batting approx. 60 inch by 66 inch (I used 100% cotton Quilters Dream Select)
Co-ordinating cotton thread
 
Cutting instructions:
To make the quilt top, cut each of the fabric squares from the layer cake into a 6 1/2 inch square, a 3 1/2 inch square, and two rectangles, each 3 1/2 inch by 6 1/2 inch.  The picture below will make it clearer as to how to cut your fabric.
 
Cutting diagram for Bluebird Park quilt

Cutting diagram for Bluebird Park quilt

 
You don’t need to always cut the largest square from the top left if the design placement would work better if, for example, the large square was cut at the lower right.  You just need to ensure that you get all four shapes.  Before cutting, I also checked that my layer cake squares were exactly 10 inch square.  It is probably not essential to do this so if you’re more of a “let’s get stuck in” kinda gal, then just get cutting.
 
Whilst you have your rotary cutter to hand, from the binding fabric cut 6 strips, each 2 1/2 inch wide, across the width of the fabric.
 
Sewing instructions:
Once you have cut up all your layer cake squares, you can start to have some fun. You now sew your layer cake squares back together using a different fabric design for each of the four positions in the cutting diagram.  
 
Using a 1/4 inch seam, sew a rectangle to a large square and press the seam toward the square.  Then sew another rectangle to a small square, pressing the seam toward the small square.  Finally sew the small square strip to the large square strip, nesting the seams where the points of the two squares meet.  This large square forms the block for the quilt.   
 
The quilt is comprised of 42 blocks which means you will use all of the layer cake.  If you wanted your quilt to go on a single bed, then I would make it as 7 rows with 6 blocks in each row.  If you wanted your quilt as a sofa throw like my version, then lay it out as 6 rows with 7 blocks across each row. 
 
Here is some printed card that I cut up to show the layout for the blocks.  
 
Bluebird Park quilt block layout

Bluebird Park quilt block layout

I couldn’t show the full quilt layout however there is enough that you should be able to see the repeat of the pattern.   The first four blocks in rows one and two form the repeat.  So row four would have the same block placement as row two.  This means your first block on row four would have a small square in the bottom left, the next block would have a small square in the top right, the third block would have a small square in the bottom right and so on.  
*Update:  the block orientation of the first two blocks on the second row is not correct.  The large square and small squares should be diagonally opposite each other.  The small squares in the first two blocks on the second row are in the correct position however the large squares in these blocks need to be moved from bottom to top and top to bottom respectively.  Many apologies for the error.
 
If you are using a directional fabric, such as Bluebird Park, you might want to lay out your quilt design before making up your blocks so that you don’t end up with bikes riding sideways or rabbits standing on their heads (unless you don’t want your quilt to have an obvious up or down).
 
Once you are happy with your block placement, sew blocks together for each row and then sew the rows together.  You will now have finished your quilt top, yay!
 
Sew your backing fabric so that it makes a piece at least 4 inches bigger on all sides than your quilt top.  Baste the backing, wadding and quilt top together then quilt as desired.  Finally sew your binding strips together to make one long strip and attach it to your quilt.
 
Congratulations!  You now have a lovely soft and cuddly quilt.
 
I hope you enjoy making your own version of my Bluebird Park quilt.  If you have any questions regarding the instructions, please do contact me.  Have fun!
 
 
 * layer cakes are produced by Moda and comprise 42 10 inch squares from a single fabric collection. 

3 great quilt binding tutorials

Binding is a really important component of your quilt as it is the frame that adds that finishing touch.  When I started quilting, I struggled to get a binding finish that I really liked.   For me, my first bindings looked a little too flat when I wanted them to be full and plump.  I also wasn’t keen on the appearance of the commonly used binding finish where one end is tucked inside the other (shown here on one of my first quilts).  
 
Binding tucked inside

Binding tucked inside

 
What I really longed to do was to sew a continuous binding which looks so much neater and less conspicuous.  Fortunately, there are lots of very experienced quilters worldwide who are happy to share their knowledge and skills via the internet.  Thanks to their generosity, and a bit of practice on my part, I now routinely sew a continuous quilt binding (you can just see the seam next to the little bird – neat, isn’t it?) and they always come up plump and puffy.  
 
Continuous quilt binding

Continuous quilt binding

 
If you have struggled to achieve a professional appearance for your quilt binding, then here are my three favourite binding tutorials that I used to hone my technique.
 
Tutorial 1
Rita, from Red Pepper Quilts, is one of my favourite quilters.  It was as a result of reading her blog that I first realised that a continuous binding was even possible.  Even better, Rita has a fabulous tutorial on her blog that clearly shows how to sew a continuously seamed binding.  She also shows in detail how to machine sew the binding on the reverse, rather than hand sewing, although I haven’t tried this myself.  
 
Tutorial 2
Next up is Kimberley from the Fat Quarter Shop who has produced a great YouTube video.  In the video, Kimberley shows how to sew a continuous seamed binding using a binding tool.  I don’t have the binding tool and instead use my corner trimmer to achieve the same result.  I also don’t have a Simplicity bias tape maker although it is on my lust list.  As an added bonus, Kimberley shows how to trim the quilt so that the backing and wadding is slightly bigger than the top.  This is the secret to creating a fuller binding.
 
Tutorial 3
Finally, this tutorial from Sewing4home.  This very comprehensive tutorial covers all aspects of cutting and sewing quilt binding.  It has loads of hints and tips including information on how to calculate the amount of fabric you need to bind your quilt.  
 
So there you have it.  Three fabulous binding tutorials to help you achieve a professional binding for your quilt.  Happy sewing!