Double gauze swaddle blanket – a tutorial

Spring seems to be the season for new babies  – baby lambs, baby birds and lots of human babies too.  A lovely present for a new baby is a swaddle blanket.  One that has been handmade makes that gift extra special.

Swaddle blankets are easy to make and take very little time.  You could easily whip one up in an afternoon.  They make a beautiful and practical gift for a baby shower or new mum.  Not just for swaddling babies (although they are great for that), swaddling blankets also make fabulous nursing wraps and pram covers.

Double gauze with its light, airy feel is the perfect fabric to use for a swaddle blanket.  Sarah Jane has just released a new double gauze as part of her Sommer range for Michael Miller.  Made from 100% cotton, it is deliciously soft, light as a feather and comes in a range of beautiful fresh colours.   At 52 inches wide it is more than enough for a decent sized swaddle blanket.  And because it is cotton, it is breathable and ideal for warmer weather.

So how do you make one?  I searched the internet so you don’t have to and found this great tutorial by Molly from Purl Soho.   This is my slightly modified version.

For a 44 inch square swaddle blanket you will need:

  • 1.25 metres of Sommer double gauze (I used Mini Painted Gingham in Mist)
  • 100% cotton thread (I used Aurifil 50wt in off-white)
  • 70/10 needles (not essential however I found it helpful to use a finer needle)
Double gauze swaddling blanket materials

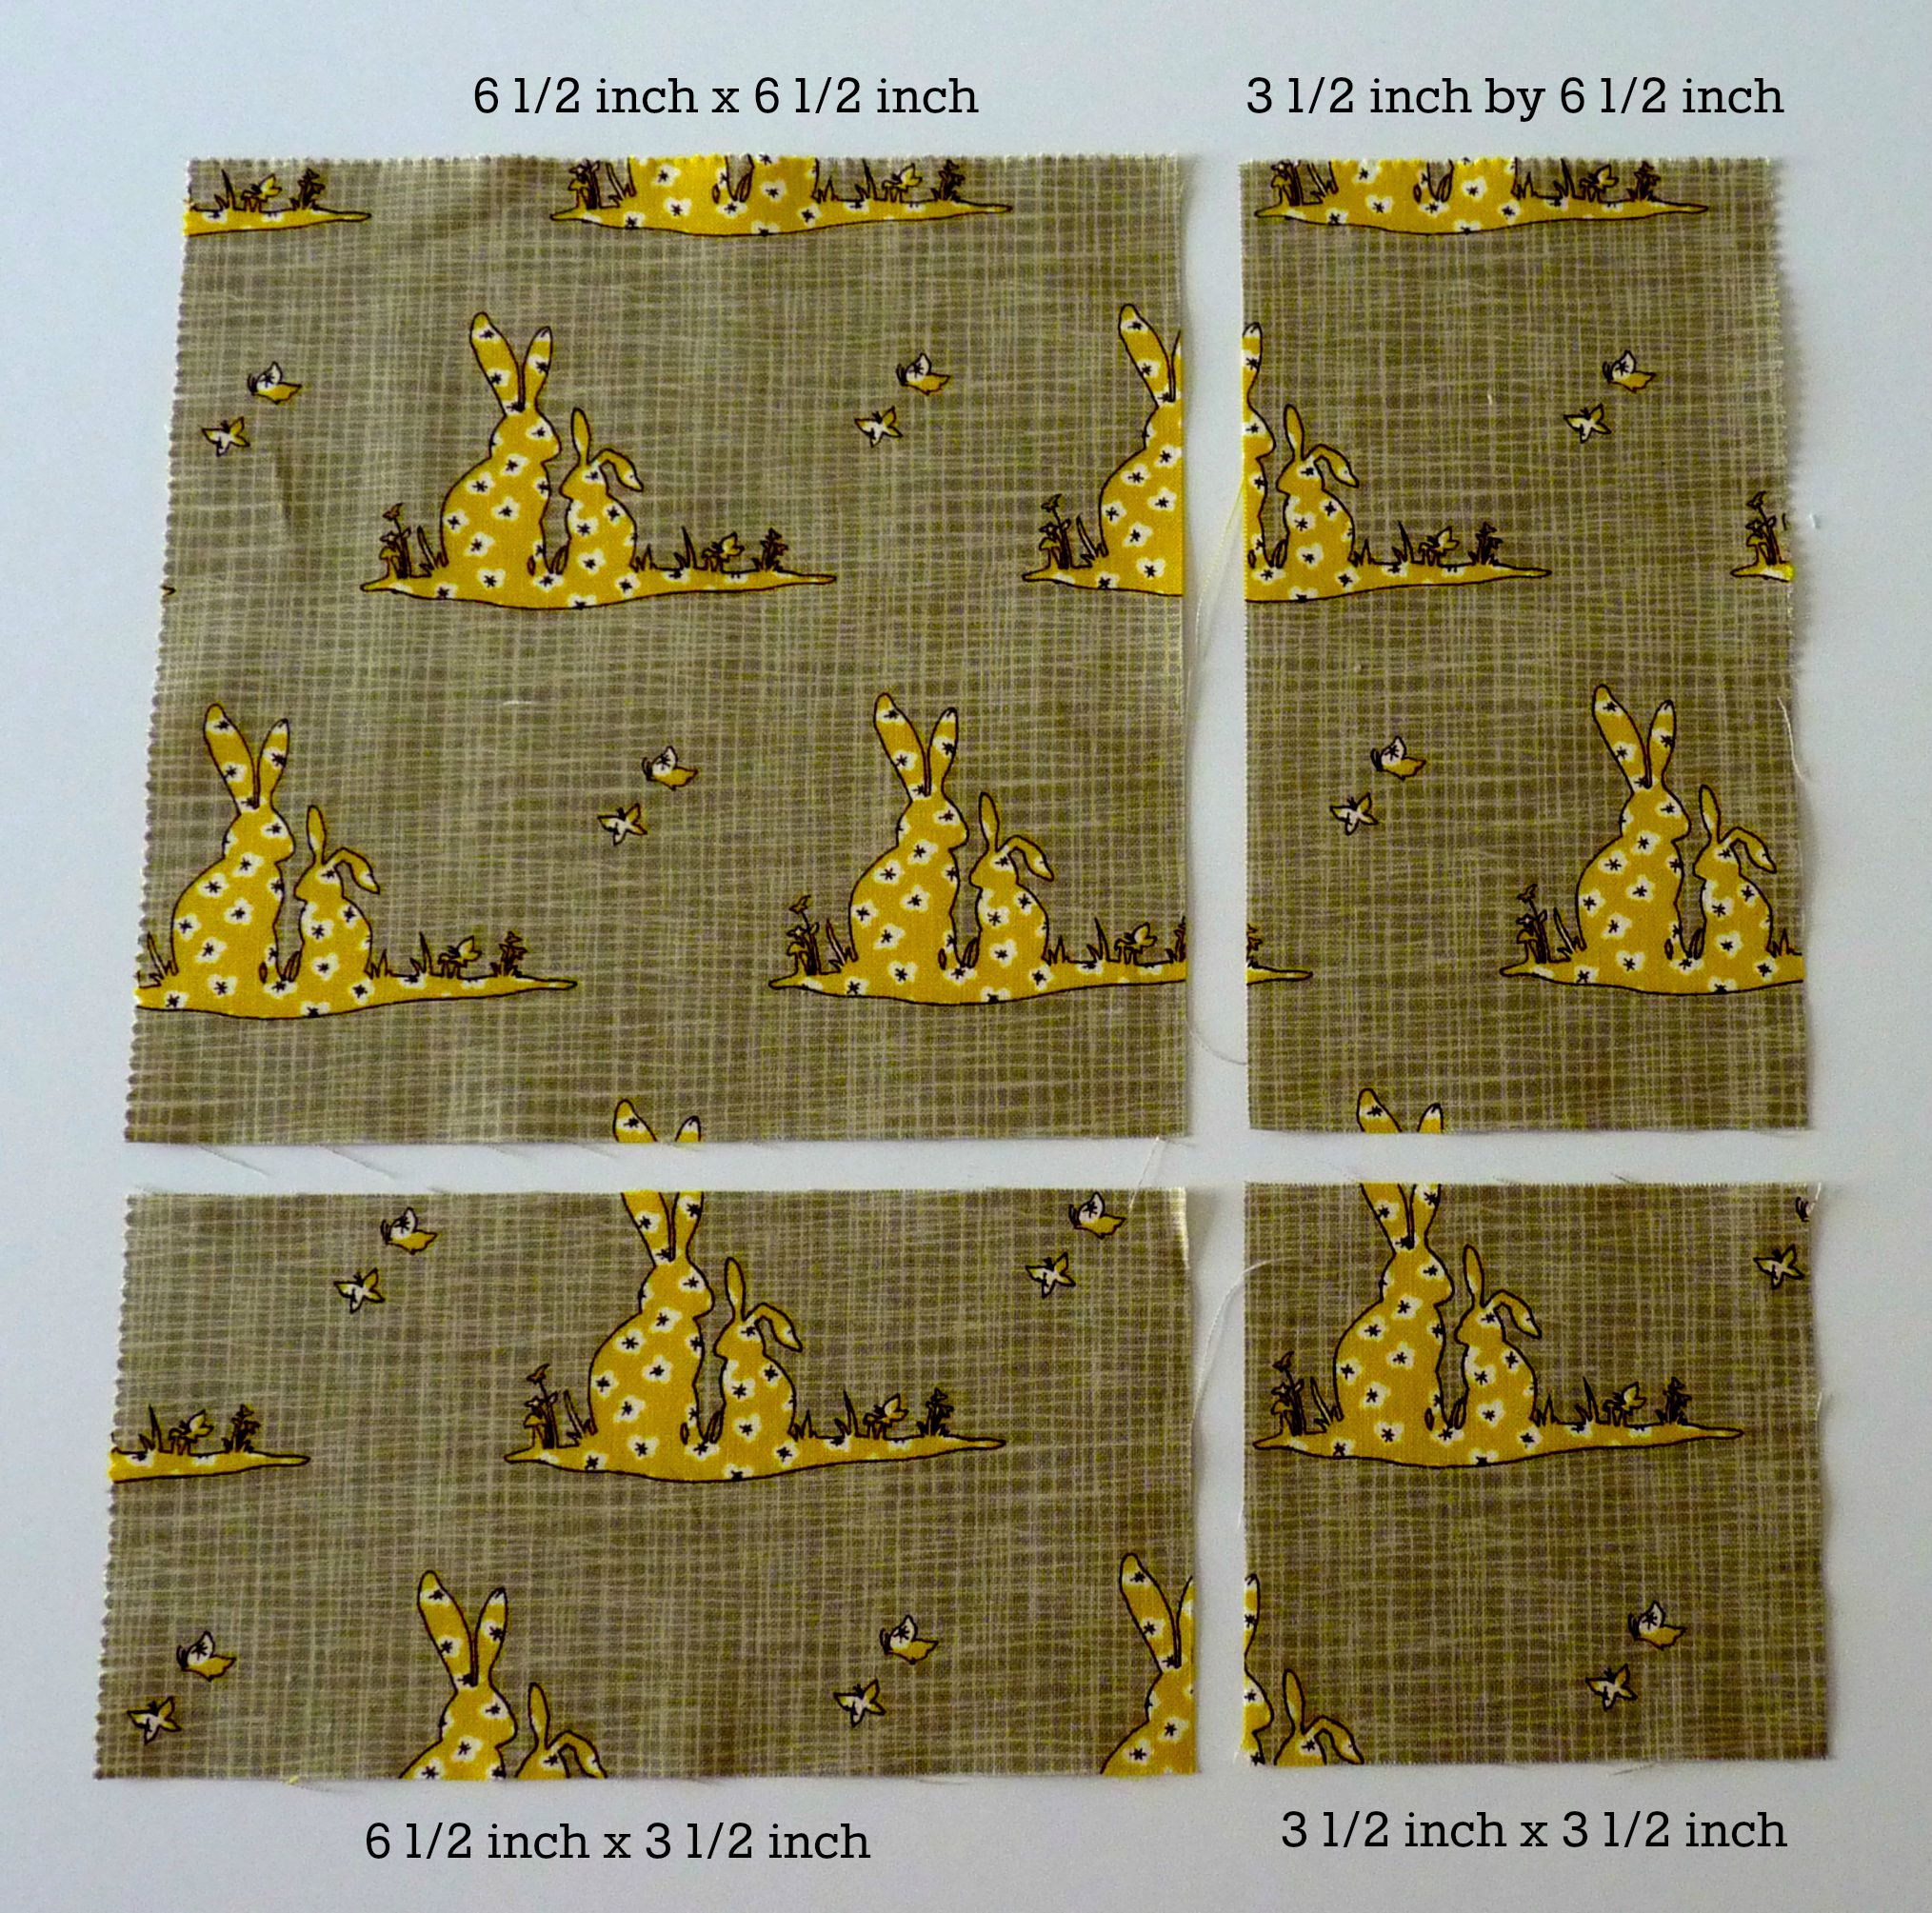
Double gauze swaddle blanket materials

The gauze I used is helpfully marked with a grid of one inch squares (you can see them in the photo above as a line of slightly looser weave which is where the gauze layers are joined together).  These grid lines are much easier to see when the wrong side of the fabric is uppermost.  Using these lines as a guide, cut the piece of double gauze to 46 inches long.  I found it easier to use scissors and a single layer of fabric.  Don’t be tempted to cut a double layer of fabric.  That double gauze can be slippery.  And don’t follow the printed lines of the gingham when cutting as these won’t be on the fabric grain.  Leave the selvedges as they are for now.

On each of the cut edges, fold over a 1/2 inch hem and then fold over another 1/2 inch to give a double hem.  Use your iron to press at each step when folding your hem (takes a little longer however the finish will be much better).  Pin the hem from the right side of the fabric and sew the hem with the right side of the fabric uppermost.  I used a 3/8 inch seam and a walking foot to make it easier to control the layers.  I also increased my stitch length to 3.  Sewing the hem from the front makes it much easier to maintain the correct seam allowance and it gives a nice neat edge on the hem.

Double gauze swaddling blanket hem

Double gauze swaddle blanket hem

Lay your blanket (hemmed top and bottom) on a table and, following one of the grid lines, cut off the selvedge on one  side.  Measure 46 inches from this cut edge across your blanket and cut your blanket to 46 inches wide, thus removing the other selvedge at the same time.  Fold and sew a 1/2 inch double hem along each side.  There is no need to mitre the corners.  Just fold them over as shown in the photo above.

Ta-dah!  Your swaddle blanket is now finished.  See, even Ted loves it.

Double gauze swaddling blanket

Double gauze swaddle blanket

I found the Sommer double gauze lovely to work with.  It didn’t fray and the sizing added to the fabric gave it enough body to make it easy to handle.  I hand washed my swaddle blanket in cool water to remove the sizing and gave it a quick spin in the washing machine to get rid of most of the water.  Shinkage was minimal – about 1% – and the fabric did become amazingly soft.

The mist colour way, a pretty light turquoise, is the perfect choice for a gender neutral gift or if the sex of the baby is unknown.  Other colours available include pink, blue and grey.  Fabric HQ, which is where I bought mine, has a good range of both the single and double gauze.

Happy sewing!

Advertisement

How to make a tiara cupcake topper

For a recent cake order, I was asked to include a tiara as one of the cupcake toppers. I did not have a specific mould or cutter for a tiara and no time to order one. What to do? Thankfully necessity is the mother of invention so time to get a bit creative with my existing cutters.


Here is my tiara topper, complete with a sparkly ruby heart jewel.


Tiara cupcake topper, tiara cupcake decoration

Tiara cupcake topper

And this is how I made it for anyone else who might like to make one too.


What you’ll need:


Tiara cupcake decoration materials

Tiara cupcake topper materials

I used florist paste to make my tiara however fondant mixed with a bit of tylose or gum trag would also work. Roll the paste until it is 2-3 mm thick. Don’t roll it too thin or the tiara won’t stand up.


Tiara cupcake decoration method

Tiara cupcake topper method

Use a frangipani cutter to cut out the main tiara shape (I love it when cutters are multi functional). Then use a small heart cutter to cut a heart shape on each side of the tiara. Use a small oval cutter to cut an oval in the centre.  The heart cutter I used was 1.5 cm at its widest point and the oval cutter was 1.3cm long.


Now it looks like a tiara. Stand it up, curve it into shape and leave to dry.  When it is dry, paint it with edible metallic paint or dust with metallic lustre dust.


To make the jewel, colour a small piece of paste dark red. Roll it out about 1mm thick and cut out a heart using a tiny heart cutter. Paint with edible glue and shake over edible glitter. Glue it onto your tiara. Ta-dah! You now have a headdress fit for any princess.

Bluebird Park quilt – a tutorial

This quilt I made was one of the most popular at my recent exhibition for Bucks Open Studios.  I have to confess, it is one of my favourites too.  
 
Bluebird Park quilt

Bluebird Park quilt

A number of people have contacted me since asking for the pattern. The world definitely needs more quilts so here is a tutorial to enable you can make your own version.
 
What you’ll need:
1 layer cake* (I used Bluebird Park by Kate and Birdie for Moda)
0.5 metre fabric for binding
3.5 metres backing fabric (more if you need to match patterns)
Wadding or batting approx. 60 inch by 66 inch (I used 100% cotton Quilters Dream Select)
Co-ordinating cotton thread
 
Cutting instructions:
To make the quilt top, cut each of the fabric squares from the layer cake into a 6 1/2 inch square, a 3 1/2 inch square, and two rectangles, each 3 1/2 inch by 6 1/2 inch.  The picture below will make it clearer as to how to cut your fabric.
 
Cutting diagram for Bluebird Park quilt

Cutting diagram for Bluebird Park quilt

 
You don’t need to always cut the largest square from the top left if the design placement would work better if, for example, the large square was cut at the lower right.  You just need to ensure that you get all four shapes.  Before cutting, I also checked that my layer cake squares were exactly 10 inch square.  It is probably not essential to do this so if you’re more of a “let’s get stuck in” kinda gal, then just get cutting.
 
Whilst you have your rotary cutter to hand, from the binding fabric cut 6 strips, each 2 1/2 inch wide, across the width of the fabric.
 
Sewing instructions:
Once you have cut up all your layer cake squares, you can start to have some fun. You now sew your layer cake squares back together using a different fabric design for each of the four positions in the cutting diagram.  
 
Using a 1/4 inch seam, sew a rectangle to a large square and press the seam toward the square.  Then sew another rectangle to a small square, pressing the seam toward the small square.  Finally sew the small square strip to the large square strip, nesting the seams where the points of the two squares meet.  This large square forms the block for the quilt.   
 
The quilt is comprised of 42 blocks which means you will use all of the layer cake.  If you wanted your quilt to go on a single bed, then I would make it as 7 rows with 6 blocks in each row.  If you wanted your quilt as a sofa throw like my version, then lay it out as 6 rows with 7 blocks across each row. 
 
Here is some printed card that I cut up to show the layout for the blocks.  
 
Bluebird Park quilt block layout

Bluebird Park quilt block layout

I couldn’t show the full quilt layout however there is enough that you should be able to see the repeat of the pattern.   The first four blocks in rows one and two form the repeat.  So row four would have the same block placement as row two.  This means your first block on row four would have a small square in the bottom left, the next block would have a small square in the top right, the third block would have a small square in the bottom right and so on.  
*Update:  the block orientation of the first two blocks on the second row is not correct.  The large square and small squares should be diagonally opposite each other.  The small squares in the first two blocks on the second row are in the correct position however the large squares in these blocks need to be moved from bottom to top and top to bottom respectively.  Many apologies for the error.
 
If you are using a directional fabric, such as Bluebird Park, you might want to lay out your quilt design before making up your blocks so that you don’t end up with bikes riding sideways or rabbits standing on their heads (unless you don’t want your quilt to have an obvious up or down).
 
Once you are happy with your block placement, sew blocks together for each row and then sew the rows together.  You will now have finished your quilt top, yay!
 
Sew your backing fabric so that it makes a piece at least 4 inches bigger on all sides than your quilt top.  Baste the backing, wadding and quilt top together then quilt as desired.  Finally sew your binding strips together to make one long strip and attach it to your quilt.
 
Congratulations!  You now have a lovely soft and cuddly quilt.
 
I hope you enjoy making your own version of my Bluebird Park quilt.  If you have any questions regarding the instructions, please do contact me.  Have fun!
 
 
 * layer cakes are produced by Moda and comprise 42 10 inch squares from a single fabric collection. 

3 great quilt binding tutorials

Binding is a really important component of your quilt as it is the frame that adds that finishing touch.  When I started quilting, I struggled to get a binding finish that I really liked.   For me, my first bindings looked a little too flat when I wanted them to be full and plump.  I also wasn’t keen on the appearance of the commonly used binding finish where one end is tucked inside the other (shown here on one of my first quilts).  
 
Binding tucked inside

Binding tucked inside

 
What I really longed to do was to sew a continuous binding which looks so much neater and less conspicuous.  Fortunately, there are lots of very experienced quilters worldwide who are happy to share their knowledge and skills via the internet.  Thanks to their generosity, and a bit of practice on my part, I now routinely sew a continuous quilt binding (you can just see the seam next to the little bird – neat, isn’t it?) and they always come up plump and puffy.  
 
Continuous quilt binding

Continuous quilt binding

 
If you have struggled to achieve a professional appearance for your quilt binding, then here are my three favourite binding tutorials that I used to hone my technique.
 
Tutorial 1
Rita, from Red Pepper Quilts, is one of my favourite quilters.  It was as a result of reading her blog that I first realised that a continuous binding was even possible.  Even better, Rita has a fabulous tutorial on her blog that clearly shows how to sew a continuously seamed binding.  She also shows in detail how to machine sew the binding on the reverse, rather than hand sewing, although I haven’t tried this myself.  
 
Tutorial 2
Next up is Kimberley from the Fat Quarter Shop who has produced a great YouTube video.  In the video, Kimberley shows how to sew a continuous seamed binding using a binding tool.  I don’t have the binding tool and instead use my corner trimmer to achieve the same result.  I also don’t have a Simplicity bias tape maker although it is on my lust list.  As an added bonus, Kimberley shows how to trim the quilt so that the backing and wadding is slightly bigger than the top.  This is the secret to creating a fuller binding.
 
Tutorial 3
Finally, this tutorial from Sewing4home.  This very comprehensive tutorial covers all aspects of cutting and sewing quilt binding.  It has loads of hints and tips including information on how to calculate the amount of fabric you need to bind your quilt.  
 
So there you have it.  Three fabulous binding tutorials to help you achieve a professional binding for your quilt.  Happy sewing!